The Museum Blog
Category: Art
Celebrating Black History Month With Art

Did you know that there is a reason we celebrate Black History Month in February? It was decided in 1976 by President Gerald Ford to coincide with Abraham Lincoln and Fredrick Douglas’ birthdays. Both have long been aligned with and celebrated in Black communities for their efforts as abolitionists. Black History Month is a great time to use play based learning activities to discuss prominent people in history.
In the Muse Art Studio at The Children’s Museum of New Hampshire, crafts inspired by black artists are available to make, but they are always easy and fun to replicate at home!
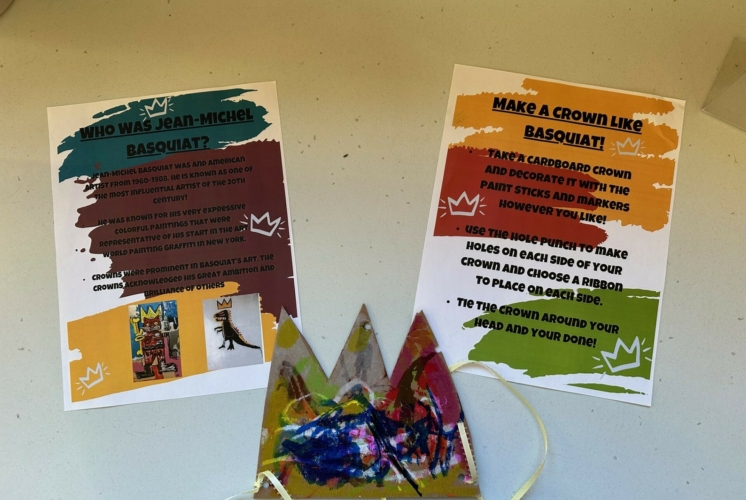
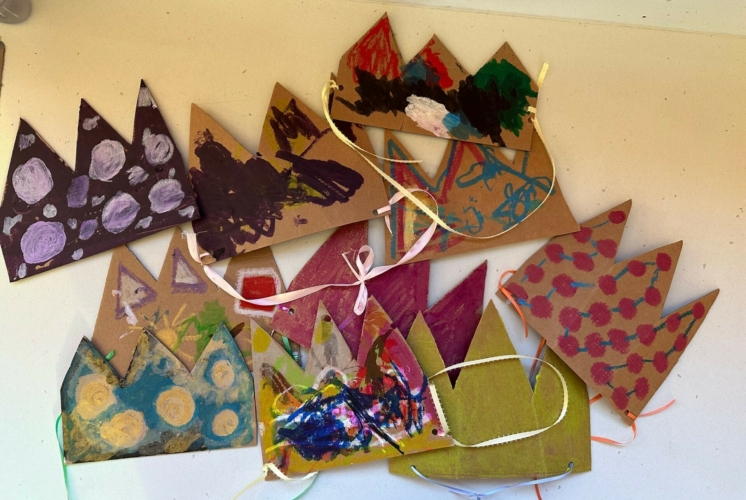
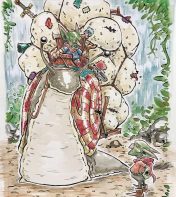
Jean-Michel Basquiat was an American artist who lived from 1960-1988. He is known as one of the most influential artists of the 20th century! He was known for his very expressive and colorful paintings that were representative of his start in the art world painting graffiti in New York.
Crowns were a very prominent feature in a lot of Basquiat’s art. The crowns acknowledged his great ambitions in the art world and the brilliance of other artists and people in his life.
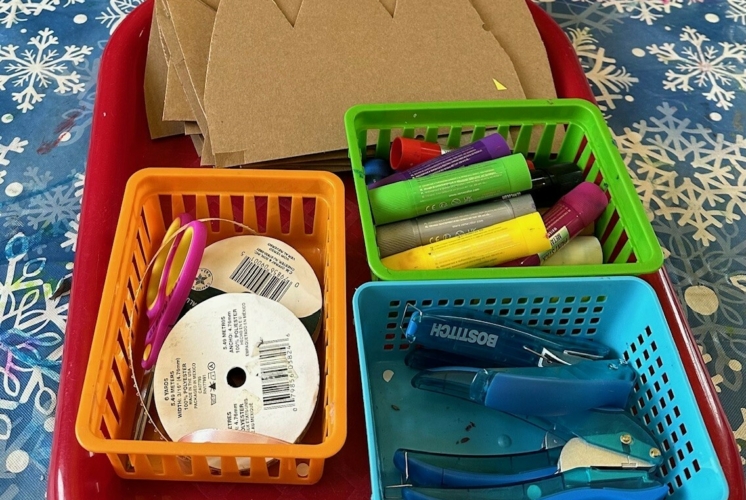
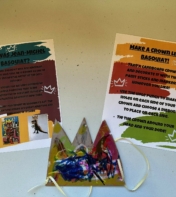
You can make your own version of a Basquiat crown at home with a few craft supplies:
Cardboard (cut into crown shape)
Ribbon
Hole punch
Scissors
Paint sticks (or something to color with. Markers, paint, crayons, etc)
Glitter (optional)
Using the cardboard cutout of the crown, color it however you like! This is your chance to make something bold and colorful like Jean-Michel, so go wild!
Use the hole punch to make holes on each side of the crown and tie the ribbon through each side so it fits around your head.
When you're done you’ll have your own crown to wear and display like the artist you are!
If you want to read more about Jean-Michel Basquiat:
http://tinyurl.com/ysde5mu2 The Life of / La Vida de Basquiat
Who Was Basquiat? Made For Kids!
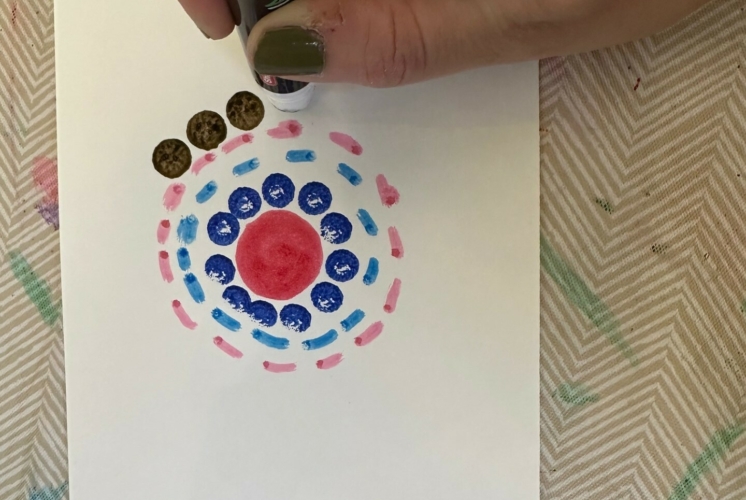
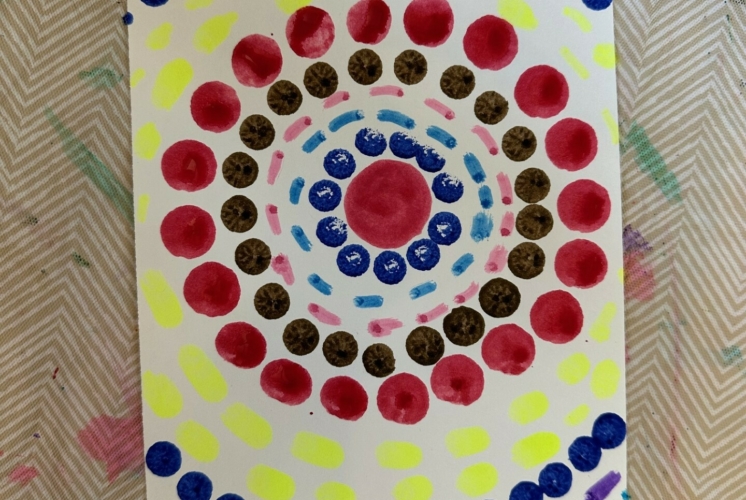
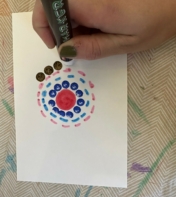
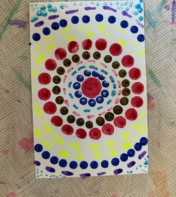
Alma Thomas was a teacher for thirty-five years and the first black American woman to receive a fine arts degree. During her teaching career she created art but is most well known for the colorful expressionist paintings she did after retiring. Her creativity was inspired by science and nature! She would ask her students to look closely at nature to find the patterns to help them make art that made them happy.
The type of art she is most famous for is called a color field. Color Field is a type of artwork in which painters use large shapes of colors to express themselves.
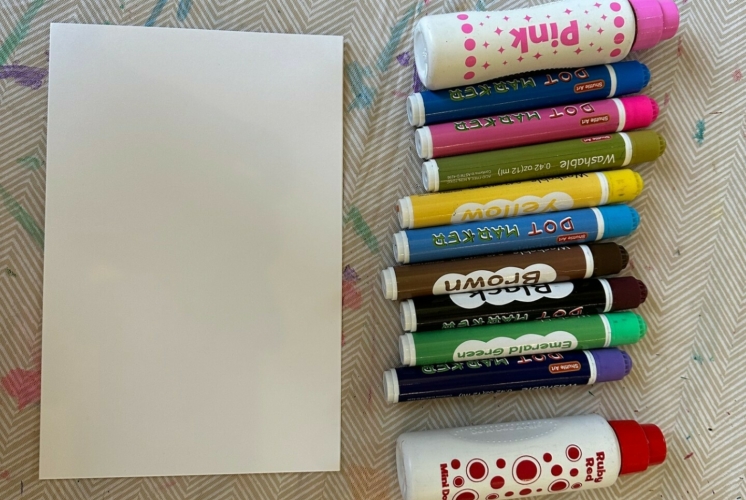
You can make Alma Thomas inspired color fields at home with some easy to find craft supplies.
Dot markers (If you don’t have dot markers paint and cotton swabs will work)
Paper
Using the dots make large shapes like a circle or square and then pick a different color to make the same shape again. Repeat the process until you've filled your paper!
If you want to read more about Alma Thomas:
http://tinyurl.com/yckejvby Ablaze with Color: The Story of Painter Alma Thomas
Alma Thomas: Your New Favorite Artist
Our Furry Friends: Pet Portraits by NH Artists
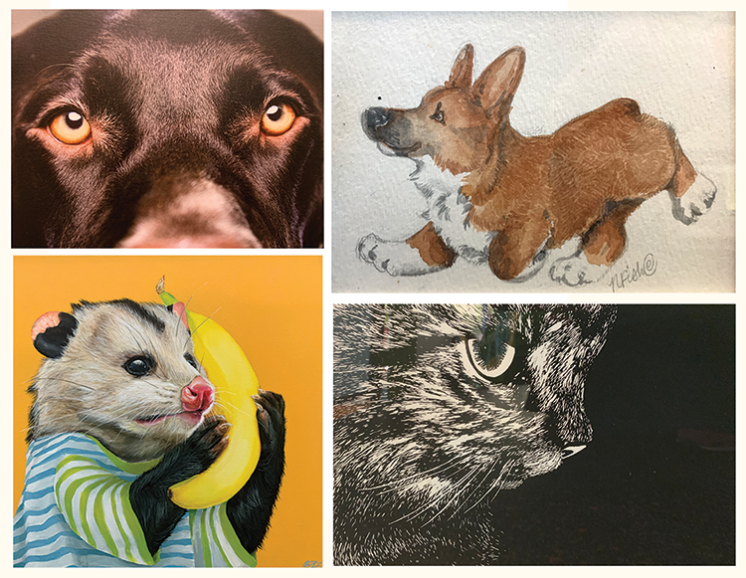
Our Furry Friends: Pet Portraits by NH Artists
New Gallery 6 Art Exhibition at the Children’s Museum of NH
Whether you call them fur babies, best friends, or companions for emotional or physical support, pets are a part of many people’s lives. Two out of every three American homes includes at least one pet and 95% percent of those households consider their pet to be a family member. Join the Children’s Museum of New Hampshire as they celebrate these furry family members and their unique personalities as captured through the art of four New Hampshire pet portraitists.
“Our Furry Friends: Pet Portraits by NH Artists” is the latest Gallery 6 art exhibition at the Children’s Museum of New Hampshire, and will be on display October 9, 2021 through January 30, 2022. Feature artists include photographer Greg West of Sit.Stay.Smile, acrylic and sketch artist Rebecca Lane of one lane studios, watercolorist Nicole Murphy Fish of Fancy Animal Art Studio, and illustrator Abby Aimesbury.
The Children’s Museum wants visitors to be a part of the fun. Museum visitors and social media followers will also be invited to participate by creating and sharing their own pet portraits for display in the Museum and the Museum will host pet portrait art-making, pet crafts, and special activities throughout the exhibition’s duration.
The Museum will also be adding a Vet Play Exhibit area sponsored by Dr. Timothy Hunt of Winichahanat Veterinary Care in Dover. This mini-veterinarians office will include stuffed animals, veterinary tools, dress up clothes, and books, and will be open during the months of the gallery show. Some of the other special activities include a “pet washing” sensory station, making pipe cleaner pets in the Muse Studio, and a special Explore More activity like inventing your own pet out of clay.
In addition to professional and visitor-created artwork, this exhibition will feature information about three animal-focused NH non-profits making a difference in their communities. The Pope Memorial Humane Society provides a safe, temporary home to more than 1,000 surrendered, lost, abused, neglected, or unwanted animals each year. ElderPet is volunteer-run and facilitates the human/pet relationships of senior citizens, people with disabilities, hospice families and clients of health care and other facilities. Operation Delta Dog rescues homeless dogs and trains them to be service dogs for veterans with PTSD and related challenges.
Gallery 6 is located in the Children’s Museum of New Hampshire and is made possible by support from the New Hampshire State Council on the Arts, Fuller Foundation and the TD Charitable Foundation.
IMAGE: Top left to bottom right: photographer Greg West of Sit.Stay.Smile, watercolorist Nicole Murphy Fish of Fancy Animal Art Studio, acrylic and sketch artist Rebecca Lane of one lane studios, and illustrator Abby Aimesbury.
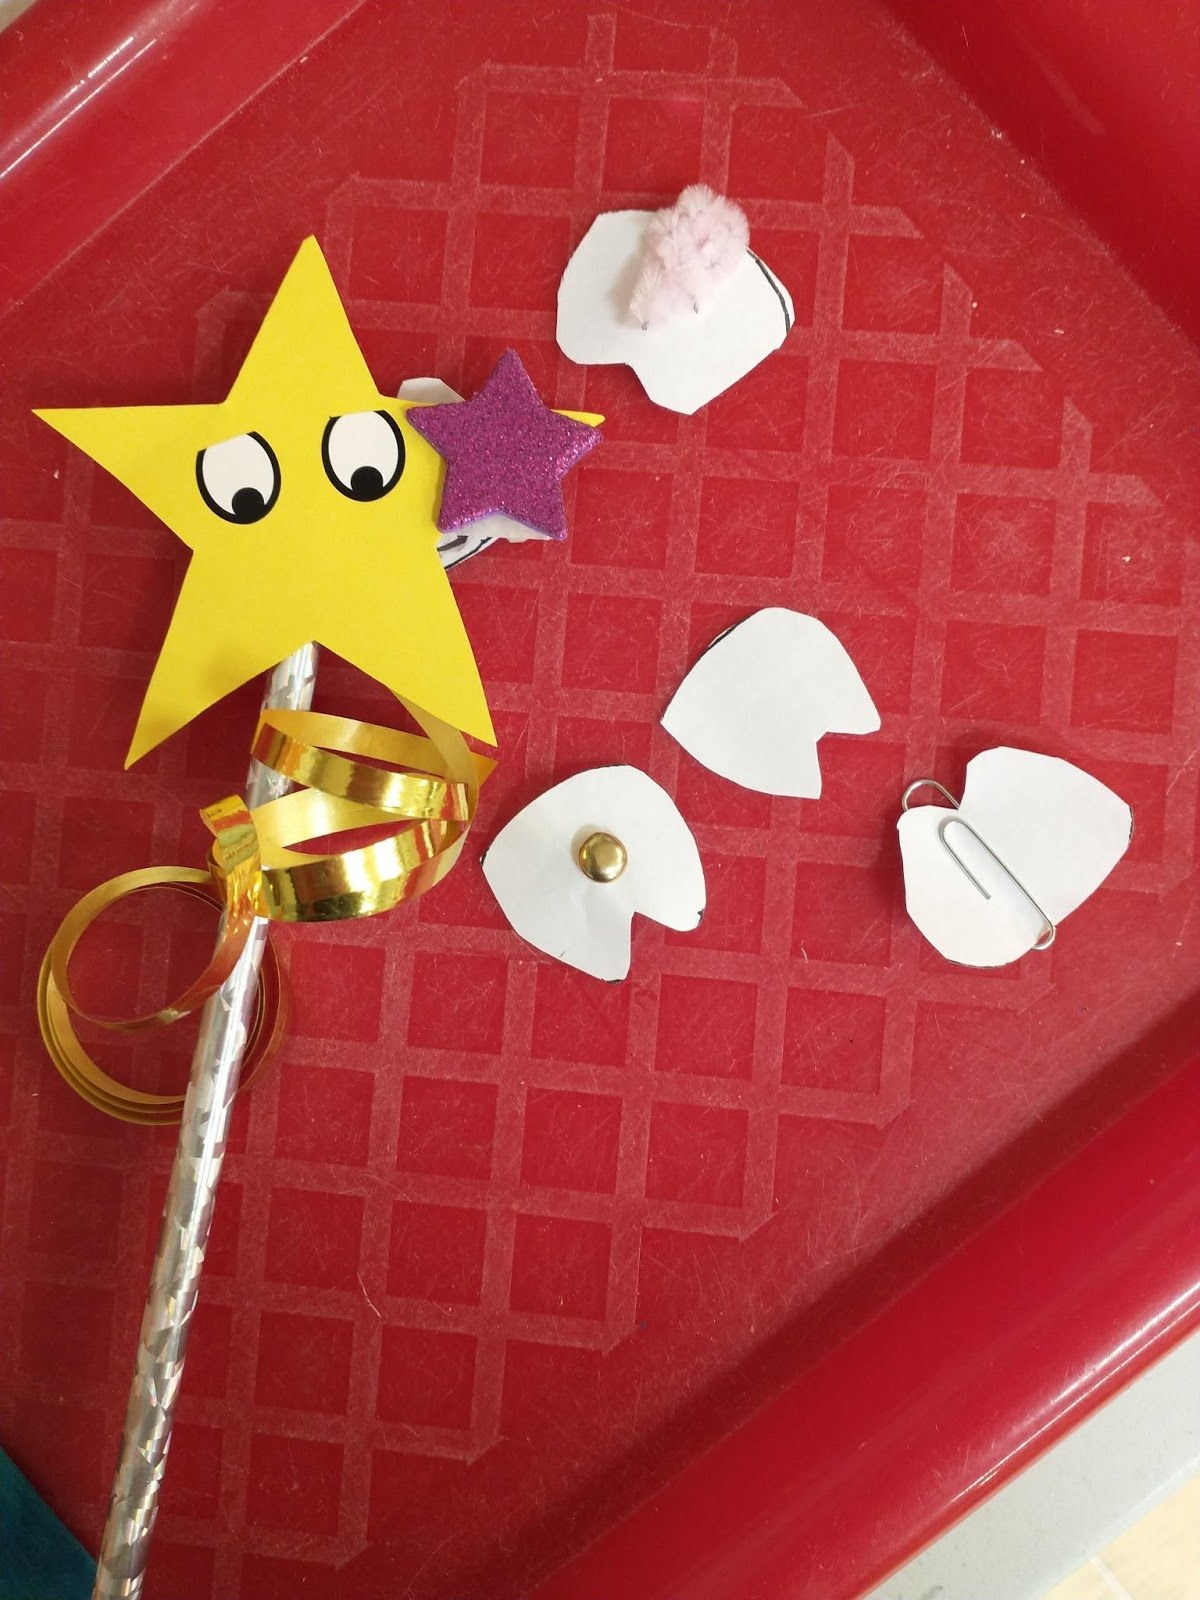
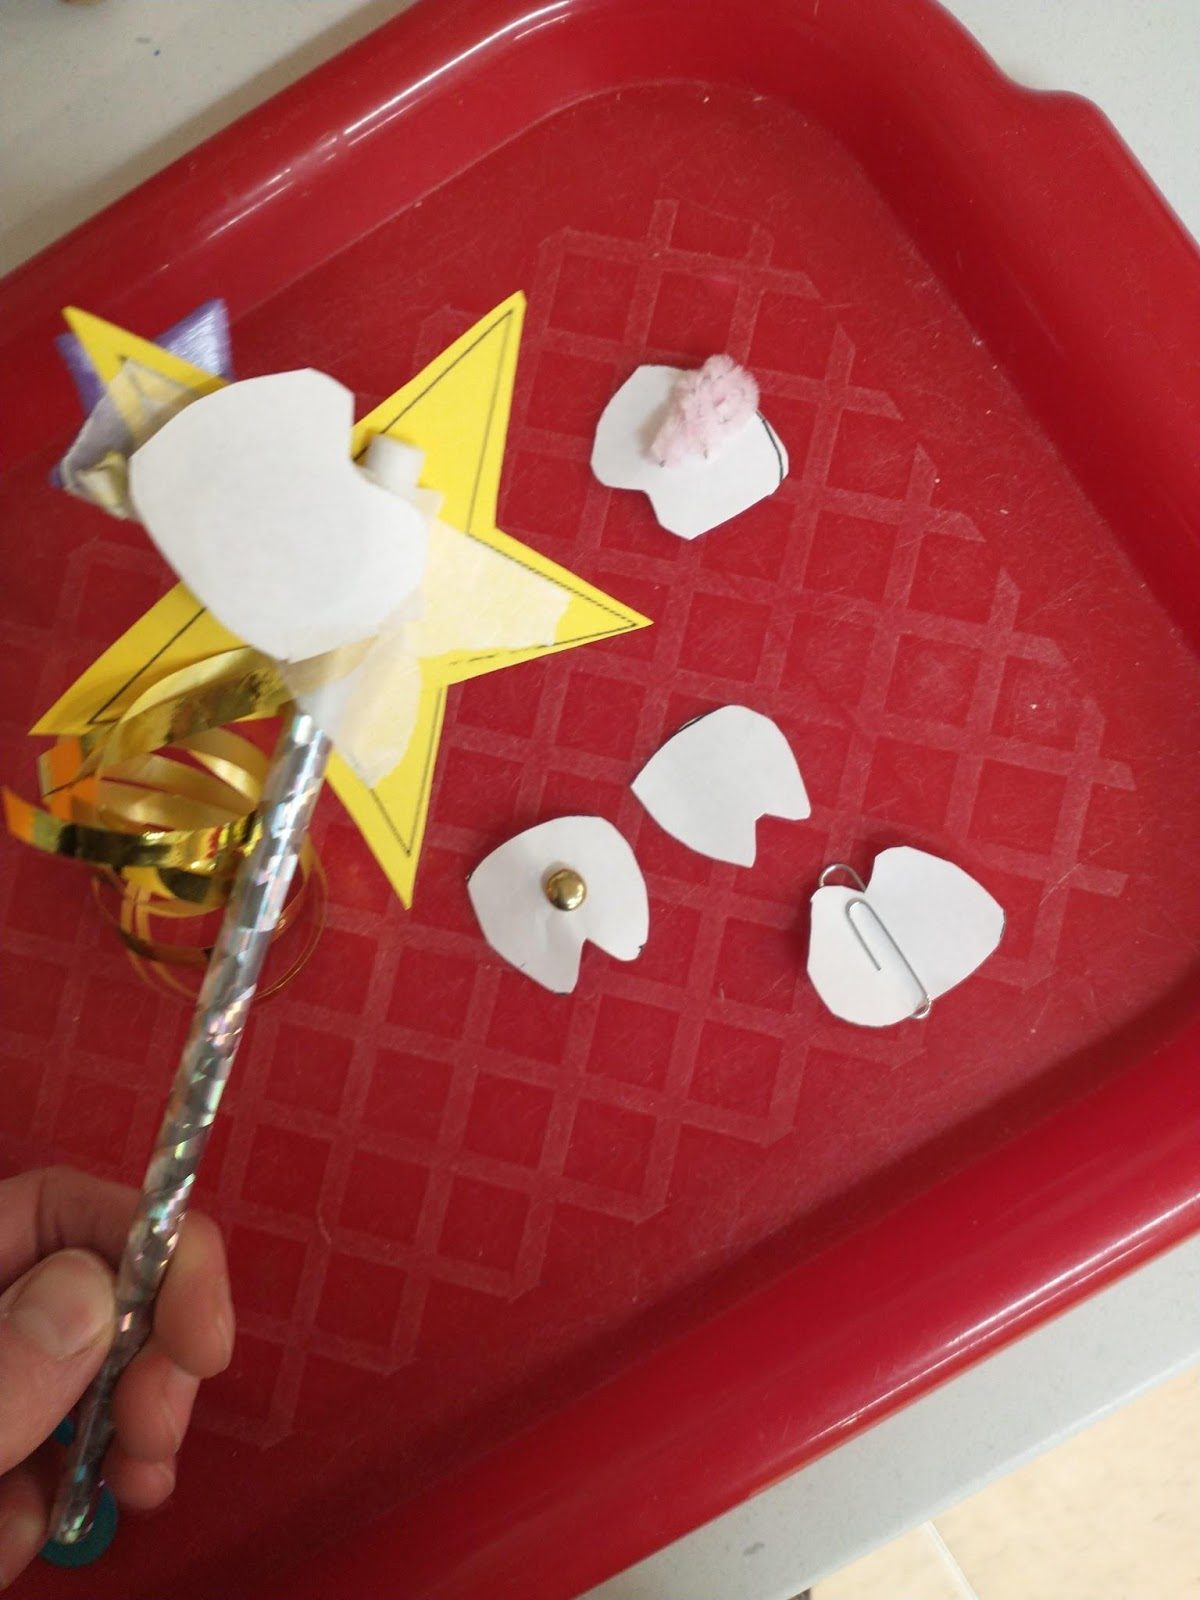
Make A Tooth Fairy Wand
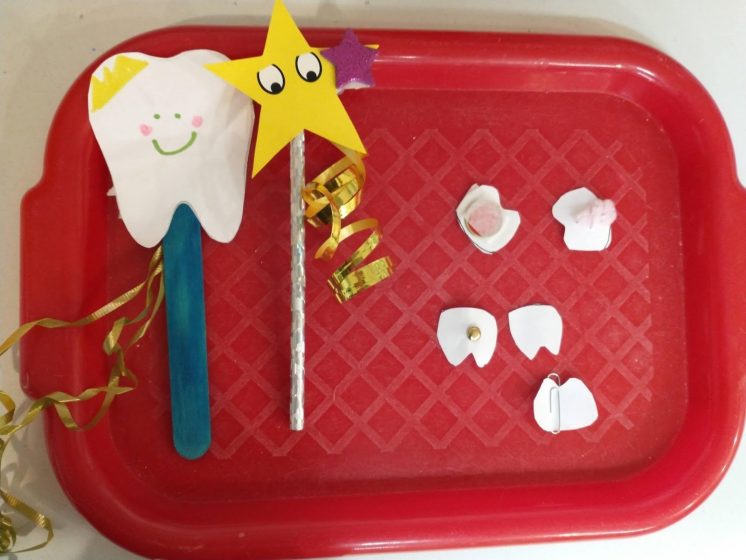
We are celebrating Family Dental Health Month at the museum, and in this video shows you how to make a magnetic tooth fairy wand. Here's what you will need to make a magic wand at home:
Supplies needed
- Paper - cut out a star or tooth shape
- Markers or crayons
- Stickers (optional)
- Tape
- Scissors
- White paper for mini teeth
- Magnet
- Paperclips, brass fastener, or pipe cleaner
- Wand- pencil, craft stick, or chopstick
- Optional: ribbon to decorate
Steps:
- First decorate the top of the wand- you could make a paper star, tooth, or a shape of your choice. Use markers or stickers to decorate it
- Next tape the paper piece of the wand to a stick- this could be a pencil, craft stick, choo stick, dowel, or even a twig from outside!
- Add some colorful ribbon or streamers to your wand if you would like
- Now carefully tape a magnet to the back of your wand. You can test the magnet first to make sure it's strong enough to pick up a paper clip (or whatever metal object you are using)
- Cut out some mini teeth using white paper, and add a paperclip, pipe cleaner, or brass fastener to each tooth
- Try out your magic wand! Place the teeth on a flat surface, and use the magnet on your wand to try to pick them up.
At the end of the video we talk about a few of the dental health books we have at the museum that cover losing teeth! Here is another great selection put together by Scholastic.
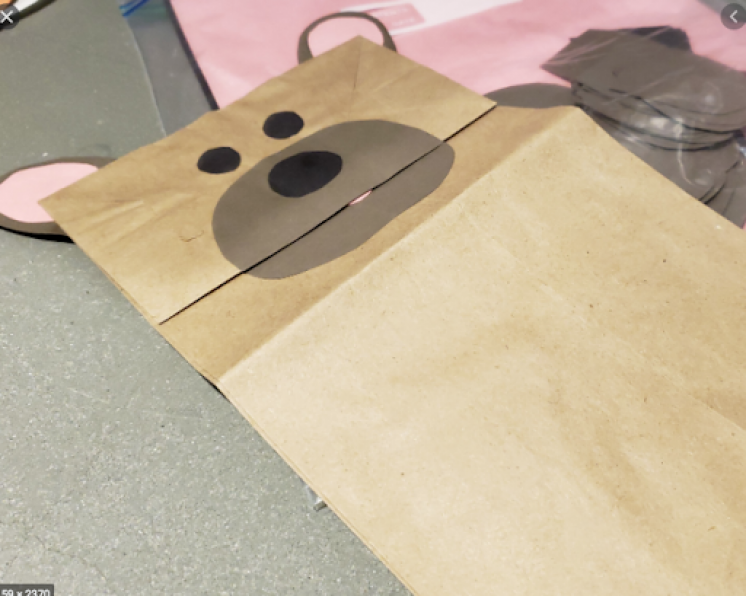
Books Alive: Bruce the Bear puppet
Make a Bruce the Bear bag puppet!
Bruce the Bear was our special guest for Books Alive & Story Explorers this month. We read “Mother Bruce” and enjoyed the story of Bruce mothering a group of baby goslings!
There are lots of other Bruce the Bear books by local Maine author Ryan T. Higgins -you can check them out at your local library and learn about Bruce’s other adventures!
To make your own Bruce the Bear puppet to bring on adventures, follow these instructions:
Materials Needed:
- Small paper bag
- Two small paper circles (for his ears!)
- One paper triangle or circle (for his nose!)
- Glue or tape
- Markers or crayons
Instructions:
- Place your paper bag on your work surface so that the square bottom is facing you and turned upwards (This will be the head/mouth of your puppet!)
- Use your glue or tape to attach the ear and nose pieces
- Decorate your puppet with markers or crayons!
Spooky Science: Frankenstein's Hand and Fizzy Pumpkin Art
by Colie Haahr, CMNH Educator
In this Spooky Science Video we make Frankenstein's "hand" come to life with a simple chemical reaction! We also demonstrated an art project using the same materials to make fizzy pumpkin art. Most of the materials for this project can be found at home, and though it's a bit messy, these are both activities that children can try on their own with just little help from a grown-up.
Frankenstein's Hand Experiment
Materials needed:
- Cup
- Disposable glove
- Baking soda
- Lemon juice or vinegar
- Tray or pan
- Scoop or spoon
Set up:
Put all the materials on a tray or another surface that can get wet. This is a good activity to try outside for an easier clean up. The ingredients we are using are actually used for cleaning, which means they should not stain surfaces. A tray is best if you have one. If desired you can pour the lemon juice or vinegar into the cup ahead of time, or children can help with this step.
Experiment:
- Place the cup on the tray, and fill it about ¼ of the way up with lemon juice or vinegar- this experiment works with either one
- Use a spoon to place a few scoops of baking soda into the glove
- Shake the glove so that the baking soda moves down to the fingertips
- Carefully place the glove on top of the cup by stretching the elastic opening of the glove around the mouth of the cup- the fingertips should be hanging down still
- Be sure there’s a tight seal between the glove and cup- if not, hold the glove in place
- Tip the glove upright so that the baking soda drops down from the fingertips into the cup
- Watch the glove! It should start to inflate quickly as the baking soda reacts with the lemon juice inside the cup
Optional Alternative way to do this experiment:
If you do not have a glove handy you can also do this same experiment with a balloon and a plastic bottle. First, draw a face on the balloon, so that when it expands you will have a funny face or monster face on your project. The rest of the steps are the same, except you are placing the baking soda in the balloon, and carefully attaching it to the top of the water bottle. The reaction will be the same as well- the balloon will magically inflate on its own! The Children’s Museum of Indianapolis shared a video of this version of the experiment: Monster Balloon Experiment. Another resource for this experiment comes from Scholastic: Fizzy Balloon Experiment
How does it work?
Lemon juice is acidic and baking soda is a base, and when acids and bases mix together, they fizz up! You created a chemical reaction inside the cup: you mixed together a liquid and a solid, and released a gas: carbon dioxide. When you add the baking soda to the lemon juice the gas starts to move out of the cup, but the glove is blocking it from escaping. The glove inflates from the gas, and will stay inflated while the reaction continues to happen. This experiment is fun because you can “see” the gas that’s created by trapping it inside the glove. Usually, we can’t see the gas that is released from a baking soda and vinegar (or lemon juice) experiment.
Fizzy Pumpkin Art
Materials:
- Tray or placemat to work on
- Orange food coloring or liquid watercolor (mix yellow and red to make orange if needed)
- Lemon juice or vinegar
- Baking soda
- Pipette or spoon
- Pumpkin template- or draw your own with a permanent marker- works best on cardstock. Here are a few free printable pumpkin templates from FirstPallete.com: Medium Sized Pumpkin Template, Large Pumpkin Template
Set Up:
Place the pumpkin template on the tray or work surface. If you would like, use a permanent marker to draw a jack-o-lantern face on the pumpkin. Pour the lemon juice or vinegar into a cup and add the orange food coloring. If you do not have orange, mix red and yellow food coloring together to make it. Keep in mind that the color will become lighter when it mixes with the white baking soda. Spread a light layer of baking soda over the pumpkin image.
Activity Instructions:
- Once everything is set up, use the pipette to add lemon juice to the pumpkin picture
- You should see the baking soda on the pumpkin starting to fizz up! Continue to add lemon juice or vinegar until the fizzing stops
- Let your project dry, and it will become a nice art project. If there is too much liquid on the picture, either use the pipette to remove some, or gently shake it off
- Once dry, you can gently brush off any excess baking soda that is left.
- This activity uses the same ingredients as the experiment, and the chemical reaction is the same. The only difference is that we added some color to the lemon juice or vinegar, so just keep in mind that this will need more clean up, and that food coloring may stain surfaces or clothing.
Witchway Games & Eric Streed
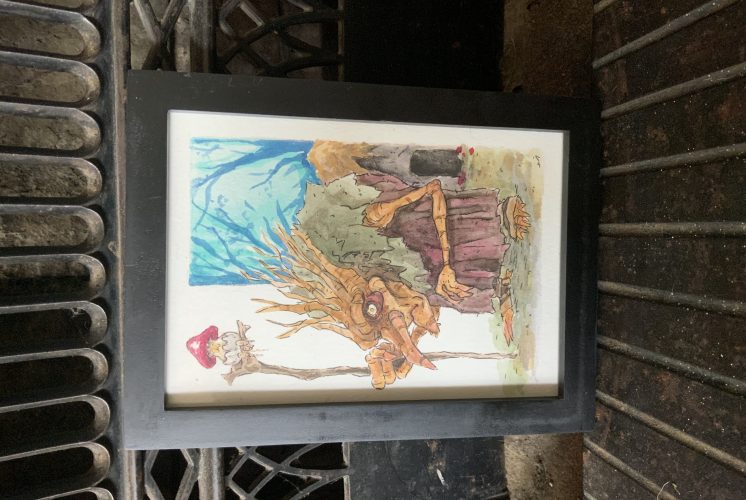
Q&A with Artist and Game Designer Eric Streed
Q. How do you start making board games?=
A. I would start by playing lots of different board games! Find out what kind of games you like, and what about those games you enjoy. Is it the theme? Do you like drafting cards? Do you like worker placement? What parts of those game maximize on that sort or play?
After you’ve started thinking about those questions, start small. Make an “expansion” to a game you already know and love. Change a rules set, or get some cheap custom cards made for it. See how the rules you change or the elements you implement add to or subtract from the game.
Game design is a skill that takes practice to get better at, your first game is not going to be perfect. Instead of perfect, focus on “Done”. The artist Jake Parker spreads the message “finished, not perfect”. This idea encourages to complete a project, and then start the next one and make it even better. Consider the table presence of the game you want to make, think of that peak moment you want to give a player, and build towards that.
Q. How did you start making board games?
A. I went to school for art, focusing on video game design. I worked for animation studios and on independent video games for a while but found the process slow and unfulfilling. I ended up co-founding a small company a few years after college and got involved making board games and immediately saw a shift. I could quickly hold my game in my hands and play it with other people. The efficiency, community, and tactile nature of board and card games really rekindled my love of game design.
Q. What is the hardest part of making board games?
A. For me the hardest part of game design is iterating. I get an idea, work with people to iron out the details, do the art for the game, get a prototype made up, and start playtesting, only to start finding issues in the design. This is a super normal part of the design process, no game is going to work perfectly right out the gate. This is the piece of the puzzle that gets very granular though, where you are fiddling with numbers, changing rules occasionally, altering the setup and win conditions. This is a crucial piece of the design process, but its also challenging as it also takes the most time.
Q. What resources are there out there for aspiring board game designers?
A. There are lots of great resources for game designers out there! There are social media groups, there are cheap game design kits available online, I’ve even hand cut cards and drawn on them for perfectly functional prototypes. After you have spent a little time making some handmade prototypes or printing some small assets for an expansion to a game you like, using a company like The Game Crafter is a great way to step up your designs and create some really beautiful production quality copies of your game.


Wacky Art: Windsock Craft
By Meredith Brustlin, CMNH Educator
I love this windsock craft! It’s an art project that is accessible to all ages and abilities - and you get to sneak in a little bit of science. Here’s how to make your own windsock:
Materials Needed:
- Paper (printer paper, cardstock, construction paper, etc)
- Markers or crayons
- Crepe paper streamers or tissue paper cut into long strips
- Tape or glue
- A stapler
- A hole punch or scissors
- String or yarn
Directions:
- Invite little ones to decorate their piece of paper with the markers or crayons. If you have stickers or stamps, you could use those, too!
- Once their paper is all decorated, flip it over so that you are looking at the back
- Tape or glue the streamers onto the bottom end of the paper
- If you used glue, give it a few minutes to dry
- Pick up the paper and curl it into a tube/windsock shape
- Staple on the top and the bottom
- Hole punch or cut small holes on either side of the top
- Put your string through the holes
- Hang up your windsock!
The Science:
- The science behind windsocks is pretty simple...if you put your windsock outside, you’ll be able to tell a few things:
- If the wind is blowing
- How much the wind is blowing
- Which direction the wind is coming from!
Pete the Cat Party- Painting Guessing Game
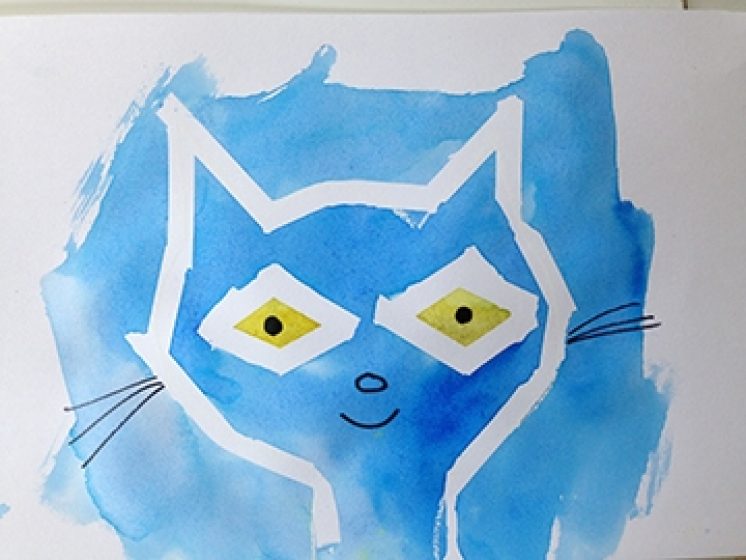
By Colie Haahr, CMNH Educator
Thank you for checking out our Pete the Cat Party video! If you followed along with the storytime, you know that Pete the Cat LOVES his white shoes, and his red shoes, and his blue shoes! He is even okay with his wet shoes! This blog post will walk you through setting up an art project guessing game, where kids can guess what Pete stepped in to change the color of his shoes.
Materials:
- Paper- cardstock, construction paper, sketch paper
- Watercolor paints
- Paint brush
- Water cup
- White crayon
- Drawings prepped ahead
Directions:
Prep Ahead: For this project, you will need to draw some pictures with a white crayon ahead of time. Each drawing should be an item that is mostly one color, and that we can imagine might change the color of Pete’s shoes. Here are some ideas:
- Green: Spinach, Peas, Avocado
- Blue: Blueberries
- Purple: blackberries, grapes
- Red: Strawberries, Raspberries, Cherries
- Orange: Oranges, Carrots
- Yellow: Buttercups or Dandelions
- Brown: Coffee, Chocolate Cake
- Black: Olives
- Draw a picture of each item on a piece of paper using a white crayon
- Set up the water colors, paintbrush, and water cup for painting
- Play the game! Ask, “what do you think Pete the Cat could step in to change his shoes a different color?” Take a few guesses.
- Now, choose one color and paint one of the pieces of paper, and see what happens! The picture you made with the crayon should magically appear
- The white crayon creates a wax resist, so the watercolors will not soak into the paper, and you can see the drawing in white.
- You can give away what color to paint each item, for example, “try painting this one red, and guess what is in the picture,” or let kids choose a color, and then ask “Is that what color strawberries are, or are they a different color?”
- Play the game for each picture you made ahead of time.
Optional: kids can try coloring with white crayons to create a wax resist, then painting over it.
Optional: you can also do this activity using tape to create an outline of Pete the Cat, and paint over it, then take the tape off when the painting is dry to see the design.