The Museum Blog
Category: Enriching Experiences
Celebrating Black History Month With Art

Did you know that there is a reason we celebrate Black History Month in February? It was decided in 1976 by President Gerald Ford to coincide with Abraham Lincoln and Fredrick Douglas’ birthdays. Both have long been aligned with and celebrated in Black communities for their efforts as abolitionists. Black History Month is a great time to use play based learning activities to discuss prominent people in history.
In the Muse Art Studio at The Children’s Museum of New Hampshire, crafts inspired by black artists are available to make, but they are always easy and fun to replicate at home!
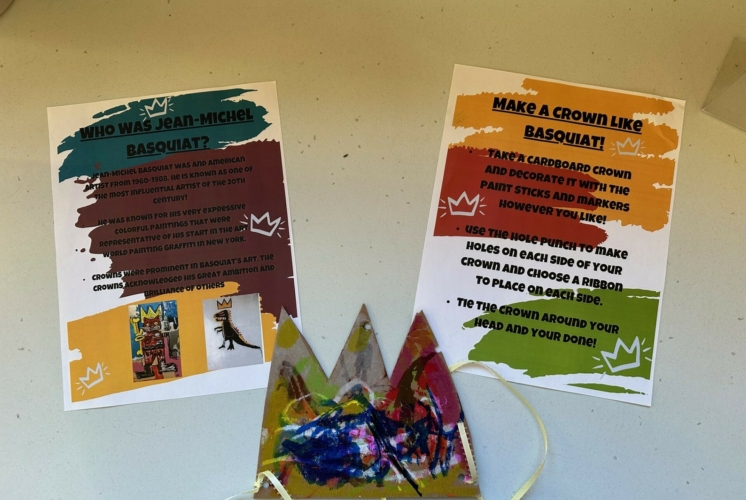
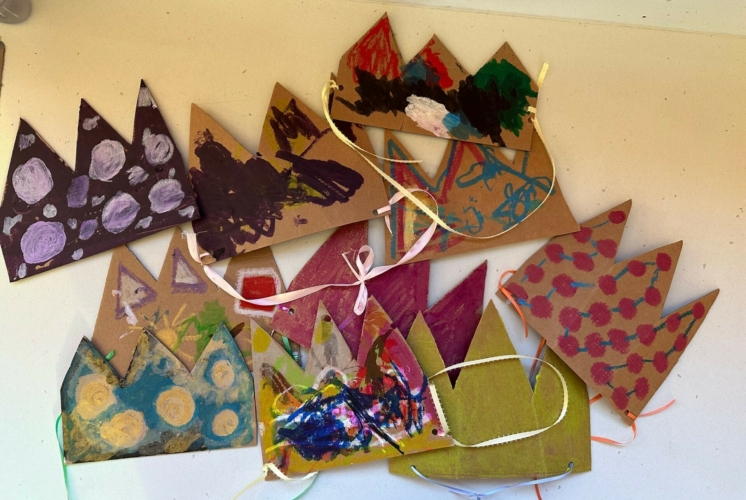
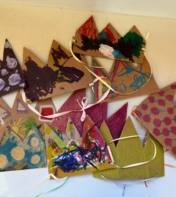
Jean-Michel Basquiat was an American artist who lived from 1960-1988. He is known as one of the most influential artists of the 20th century! He was known for his very expressive and colorful paintings that were representative of his start in the art world painting graffiti in New York.
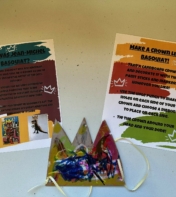
Crowns were a very prominent feature in a lot of Basquiat’s art. The crowns acknowledged his great ambitions in the art world and the brilliance of other artists and people in his life.
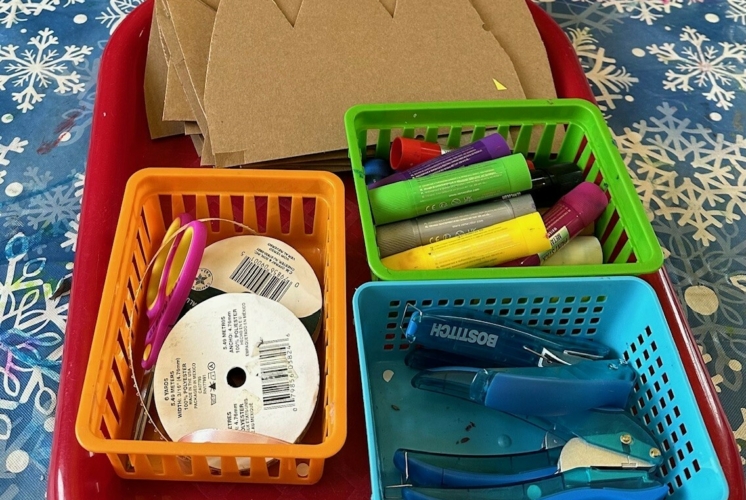
You can make your own version of a Basquiat crown at home with a few craft supplies:
Cardboard (cut into crown shape)
Ribbon
Hole punch
Scissors
Paint sticks (or something to color with. Markers, paint, crayons, etc)
Glitter (optional)
Using the cardboard cutout of the crown, color it however you like! This is your chance to make something bold and colorful like Jean-Michel, so go wild!
Use the hole punch to make holes on each side of the crown and tie the ribbon through each side so it fits around your head.
When you're done you’ll have your own crown to wear and display like the artist you are!
If you want to read more about Jean-Michel Basquiat:
http://tinyurl.com/ysde5mu2 The Life of / La Vida de Basquiat
Who Was Basquiat? Made For Kids!
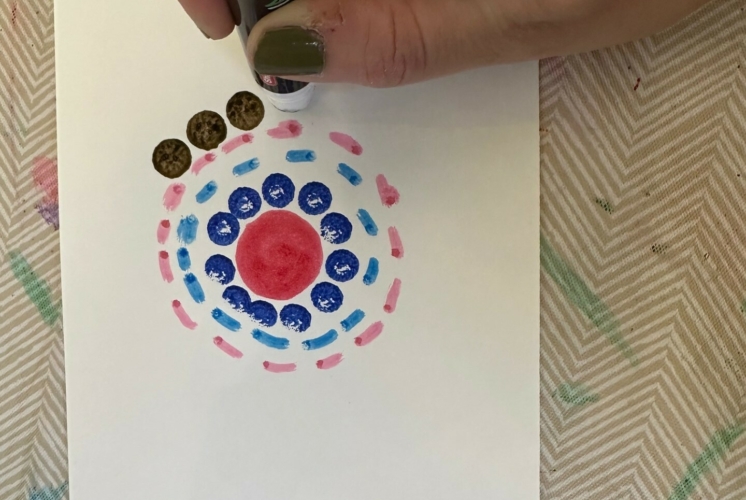
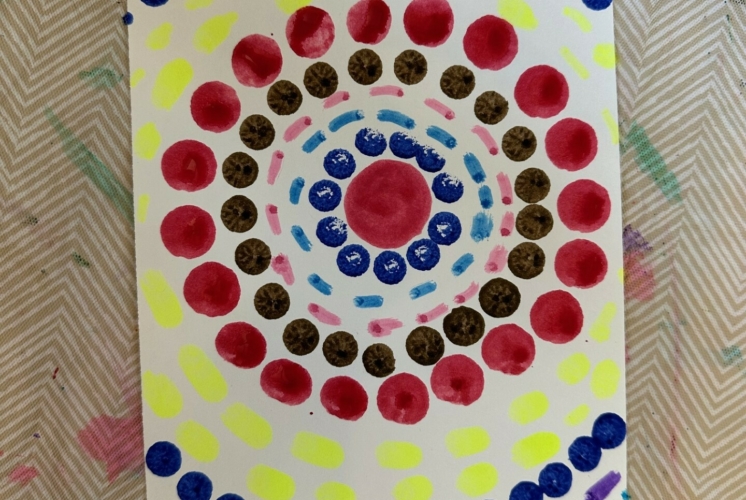
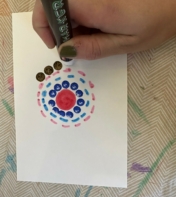
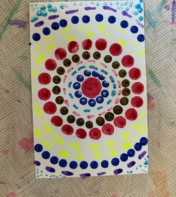
Alma Thomas was a teacher for thirty-five years and the first black American woman to receive a fine arts degree. During her teaching career she created art but is most well known for the colorful expressionist paintings she did after retiring. Her creativity was inspired by science and nature! She would ask her students to look closely at nature to find the patterns to help them make art that made them happy.
The type of art she is most famous for is called a color field. Color Field is a type of artwork in which painters use large shapes of colors to express themselves.
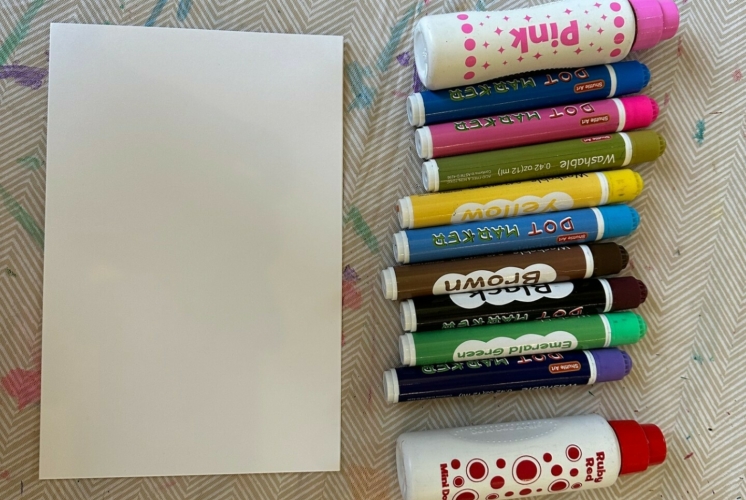
You can make Alma Thomas inspired color fields at home with some easy to find craft supplies.
Dot markers (If you don’t have dot markers paint and cotton swabs will work)
Paper
Using the dots make large shapes like a circle or square and then pick a different color to make the same shape again. Repeat the process until you've filled your paper!
If you want to read more about Alma Thomas:
http://tinyurl.com/yckejvby Ablaze with Color: The Story of Painter Alma Thomas
Alma Thomas: Your New Favorite Artist
DIY Bee Condo

By Megan Beach, CMNH Educator
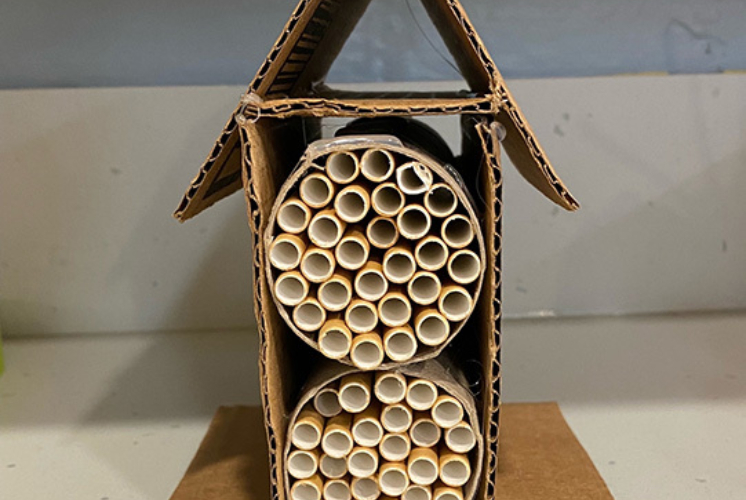
Did you know that you can build a homemade house for bees to live in? Although bees will make their own hives in places like hollow trees, or by burrowing in the ground they also will move into a bee condo, that you can make at home with just a few materials.
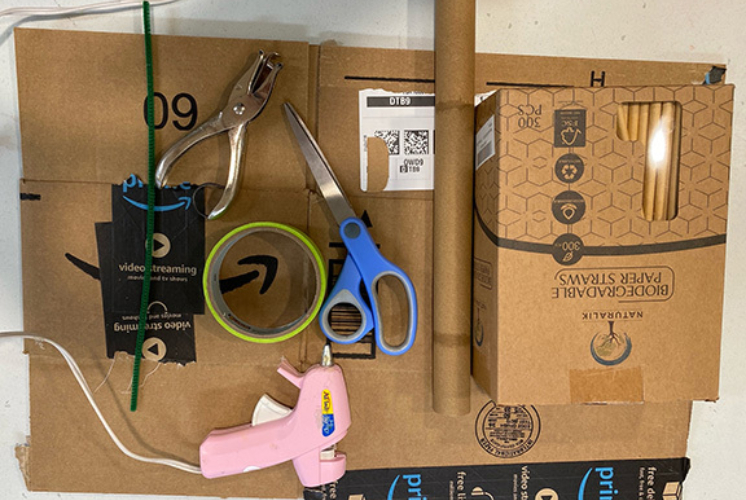
What you need to make a bee condo:
- Cardboard pieces, or heavy card stock
- Empty paper towel roll cut in half
- Paper straws (important that they are not plastic)
- Scissors
- Masking tape
- Hot glue gun (Make sure to get a grown-up to help)
- Hole punch and pipe cleaner or string
Bees find a house made out of a bundle of paper straws with one side blocked off to be a welcoming place for a home. They also prefer darker colors for their houses (it reminds them of trees) so using a brown cardboard box or dark paper works the best.
Instructions:
- Trim straws to the length of your cut paper towel roll and bundle them together with tape.
- Once straws are bundled and taped fill the tube with them and secure with glue if needed.
- Cut pieces of cardboard to fit securely around tubes in the shape of a house or tent to your liking and use the hot glue gun to fasten them together.
- Make sure to add a piece of cardboard to the back to cover one side of your bee condo.
- Use hole punch to string the pipe cleaner through the top of the house for easy hanging.
Optional:
Add moss, leaves or pinecones to the roof or any empty areas of your bee condo to help them feel more at home!
If bees do make a home in the condo be sure to not disturb them. Leave the bees alone so they can pollinate plants for us and make honey!
Spooky Science: Disappearing Ghosts
Disappearing Ghosts
Materials Needed:
- Biodegradable packing peanuts (made of corn!)
- Dark colored marker
- Pipette or paintbrush
- Small cup of water
- Tray/plate/cookie sheet
Instructions - Set-up:
- Use your marker to draw ghosty faces on several biodegradable packing peanuts
- Invite your young scientist(s) to draw some faces, too!
- Place ghosts, small cup of water, and pipette on a tray, plate, or cookie sheet
Instructions - Activity:
- Explain to young scientists that today they are going to make some ghosts disappear!
- Invite them to touch the ghosts and guess what material was used to make them
- Talk about the texture, the weight, and ask if it reminds them of anything they’ve seen/touched before
- Show them how to use their pipette and tell them to carefully drip some water onto their ghosts
- What happens?!
- You can also use a paintbrush to carefully drip water
- What happens?!
- Eventually they will notice that their ghosts are shrinking and “disappearing” into a pool of water!
- Ask them what happened? How do they think that happened? Do they think the ghosts really disappeared? Where did they go?!
The Science:
Although it may have LOOKED like the ghosts were disappearing, they were actually dissolving! The packing peanuts are made of corn, which dissolves in water. If you put a handful of these packing peanuts into a jar of water and shook it, they would completely dissolve--leaving some cloudy white water behind.
Packing peanuts are traditionally made of styrofoam which takes millions of years (we think!) to biodegrade and become dirt in the earth. These packing peanuts biodegrade almost instantly, making them much more environmentally friendly--and they also make an awesome science experiment!
Bonus Activity: Monster Ice!
Can’t get your hands on biodegradable packing peanuts? No worries! Try this fun experiment instead.
Materials Needed:
- Plastic container (freezer safe)
- Water
- Googly eyes or other Halloween trinkets (spider rings, erasers, etc)
- Small cup with warm salt water
- Pipette or paintbrush
- Tray or cookie/baking sheet
- Red & yellow food coloring (optional)
Instructions - Set-up:
- The night before the activity, or several hours before, put water into your plastic container.
- Add yellow and red food coloring to make orange, if you’d like
- Put in the googly eyes or other Halloween trinkets
- Freeze!
- Place plastic container with ice* on a tray with cup of warm salt water & pipette/paintbrush
- *You might be able to get the ice out of the container, if not--start with the ice still in the container and as young scientists add water & salt, you will easily be able to get the ice out!
Instructions - Activity:
- Invite young scientists into the experiment area
- Ask them what they see!
- Encourage young scientists to use the pipette or paintbrush to drip warm salt water onto the ice and “free” the halloween trinkets
- Ask: What is happening?
- Mention that the water is warm and has salt in it--ask how they think this might help to melt the ice
- Continue adding water until the trinkets are unfrozen!
The Science:
- Salt lowers the freezing point of water. Ice melts faster when salt is added as the salt lowers the freezing point of the ice, this is known as freezing point depression. The more salt you add the lower the freezing point.
- This is why we use salt on roads in the winter to help melt the ice and make them safe!
9th Anniversary of Alzheimer's Cafe

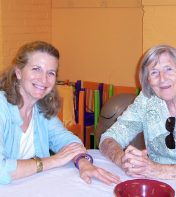
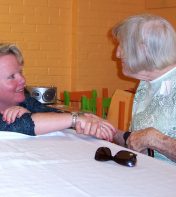
By Paula Rais, CMNH Vice President of Development and Community Engagement
paula@childrens-museum.org
In 2011, the Children's Museum of New Hampshire launched the first Alzheimer's Cafe on America’s east coast. Alzheimer’s Cafés provide a safe, supportive and judgment-free setting for people living with dementia and their loved ones to enjoy an outing in the community, socialize, and make new friends. This program exemplifies the museum’s goal of working with communities to meet existing needs and demonstrates an innovative, concrete way to provide community based solutions to these problems. The Museum’s vibrant inter-generational environment proved to be an ideal setting and the Café became very popular. Dozens of similar programs sprouted up in communities around New England modeled after the Museum’s program.
At the Café each month, we share stories and tell jokes, listen to musical performances and interesting presentations, or celebrate holidays and birthdays. Some attendees became friends and socialized outside the monthly Cafe gatherings. According to Dr. Lokvig, the founder of the first Alzheimer’s Café in the USA, “In spite of the name ‘Alzheimer’s Café’, we leave the disease at the door and celebrate the person beyond dementia. The Café is a chance for everyone to step out of their daily roles and share a positive experience in a supportive environment.”
Since Covid-19 struck in March 2020, our Café has not been able to meet. I know that our Café families are missing each other's companionship and support, and we miss seeing them at the Museum. When it is deemed safe for our staff and visitors, we will explore options for resuming this important program. Please contact me if you would like more information about the Alzheimer's Cafe or want to be on our email list to receive updates.
In the meantime, allow me to honor the occasion of the 9th anniversary of the Alzheimer's Cafe at the Children's Museum, the many families who shared their lives with us, and the generous volunteers, performers, and funders who helped make it all possible.
IMLS "Inspire!" Grant Awarded to CMNH
The Children’s Museum of New Hampshire (CMNH) in Dover has been awarded a grant in the amount of $47,182 from the Institute of Museum and Library Services (IMLS) to support a pilot project Advancing Play-Based Learning in New Hampshire, a series of educational initiatives designed to help kindergarten teachers and parents implement Play-Based Learning activities in children’s early education. CMNH was the only children’s museum in the tri-state (NH/ME/MA) area to receive this highly competitive grant.
The Advancing Play-Based Learning in New Hampshire (APLNH) project will strengthen early learning as well as provide educators with the skills they need to be successful in implementing Play-Based Learning models in the classroom, required for all kindergarten’s in New Hampshire since 2018. In a recent survey of kindergarten teachers conducted by the University of New Hampshire’s Department of Human Development and Family Studies—a CMNH partner in this project—together with the New Hampshire Department of Education, over 85% of the respondents wanted more professional development opportunities pertaining to Play-Based Learning.
“The staff of CMNH are highly practiced in using Play-Based Learning within museum exhibits and classes,” says Jane Bard, CMNH President. “As experts in early childhood education, CMNH is well positioned to fill the gap in providing kindergarten teachers with solid instructional training in Play-Based Learning.”
The grant will support numerous activities including the production and distribution of a series of instructional videos, professional development workshops, family and educator open houses and subsidized educator-led play based curriculum programs at Title 1 schools. As CMNH has done with all programs, implementation plans will be adapted as necessary in order to continue to serve NH children and families during the pandemic.
“In Play-Based Learning children have more active input into what, and how, they learn,” explains Xanthi Gray, Education Director at CMNH. “It allows them to explore, discover, negotiate, take risks, create meaning, and solve problems – all of which help develop literacy, numeracy and social skills. But it requires the teacher to be highly skilled in facilitating and implementing Play-Based Learning.”
To learn more about Play-Based Learning initiatives or other programs and resources at the Children’s Museum of New Hampshire, visit this page.
FoodWorks: Healthy Frozen Treats
Foodworks is such a fun program that we host at The Children’s Museum of New Hampshire. It promotes healthy eating, families cooking together, and delicious food that you can find at your neighborhood Hannaford!
Today we are sharing two recipes for summer time treats: Frozen Yogurt Bark and Frozen Watermelon Popsicles. Both recipes are easy to make, and are perfect cold treats for hot summer days! Summer is a great time to enjoy ice cream and popsicles, but these two recipes offer a slightly lower sugar and lower fat way to enjoy a cold dessert, and could easily be added to your summer frozen dessert routine, which we all need when it's this hot outside!
Both of these recipes only require a freezer to complete, and both are kid-friendly, so if you have eager kitchen helpers in your family, this is a great way to include everyone in some no fail cooking fun. Also, you do not need popsicle molds to make the Watermelon Popsicles!
If you want to try both recipes, it may be easier to make the yogurt bark first because the watermelon can get messy, and may be easiest to do outside. If you opt to use cookie cutters for the watermelon recipe it results in some extra pieces that need to be eaten, so this activity can double as a snack time.
First - gather your ingredients
For the frozen watermelon popsicles:
- Watermelon- If you need a smaller portion, try the pre-cut watermelon at Hannaford
Skewers, chopsticks, or popsicle sticks - Cookie cutters
For the yogurt bark:
- Plain yogurt
- Vanilla yogurt
- Optional: coconut or soy based yogurt
Optional toppings:
- Berries
- Granola
- Chocolate Chips
- Jam
- Cereal
For both:
- Wax paper
- Pan or tray
- Freezer space
Yogurt Bark Directions:
- Prep your pan or tray by putting down a sheet of waxed paper and a quick spray of cooking oil.
- In a mixing bowl, combine 1 cup of plain and 1 cup of vanilla yogurt to create a lower sugar, kid-friendly version of the bark, or simply choose a yogurt flavor you know your family will enjoy
- Add in any toppings you would like to add
- You can add the toppings to the yogurt once it’s on the tray if you would like to make some bark with toppings, and some plain
- Use a spoon or spatula to carefully add the yogurt to the waxed paper on the tray
- Place the tray in the freezer for about 4 hours or overnight
- Break up the bark to serve. You can save it in a freezer safe container.
Notes: we tried making the bark with soy based yogurt, and coconut based yogurt, both froze well, and were easy to break up and serve. We used Greek yogurt, and it made a tart treat, but be sure to use any yogurt that your family prefers. The Greek yogurt was nice and thick, so it froze well, but any yogurt should work! Please keep in mind that some of the toppings, like the berries, may create a greater risk of choking when frozen, so be sure to supervise as needed. Recipe inspired by Stonyfield Yogurt: Stonyfield Yogurt Bark Recipe
Frozen Watermelon Popsicle Directions:
- Prep a pan or tray with waxed paper
- Cut watermelon into slices- about the same thickness as you would serve to eat fresh
- If children are helping, set each person up with a work station- a cutting board or tray with waxed paper works well
- Use cookie cutters to press the watermelon into desired shape (we made stars, triangles, and circles), and remove seeds with a skewer or toothpick
- Carefully add a stick using a skewer (can be sharp), chopstick, or popsicle stick
- Place each popsicle on the lined tray and place in the freezer
- The extra watermelon scraps can be eaten as snack
- Serve any time you want a healthy refreshing treat!
Notes: This may be the easiest recipe ever aside from a little messy watermelon juice. Creating shapes with cookie cutters is completely optional- you can simply put the watermelon onto the skewer with the rind if you would like. The texture of the watermelon works really well as a frozen treat! It is very similar to the texture of an ice pop- easy to take a bite, though quite cold when it first comes out the freezer. If you opt to use popsicle sticks, use the wooden, un-dyed sticks. Colorful craft sticks tend to bleed the dye when wet, and it may not be food safe! We experimented with adding some melted chocolate chips over a few of the watermelon slices, and it tasted great, but was just a little messier to eat. Recipe reference: https://www.chopchopfamily.org/recipe/frozen-watermelon-popsicles/
We hope you enjoy these refreshing summer treats, and stay cool! Thank you to Hannaford for sponsoring our Foodworks program at CMNH!
First Friends at Home: Our Favorites!
By Meredith Brustlin, CMNH Educator
This week I shared some tried and true Baby Storytime favorites! I hope you enjoy!!
Hello Song:
Hello it’s time to play
Let’s have some fun today!
Let’s clap our hands
And wiggle our toes
A hug...and a kiss...and away we go!
Hello (insert name here) it’s time to play
We’ll have so much fun...hooray!
Open Them/Shut Them (action song)
Open them, shut them
Open them, shut them
Give a little clap-clap-clap
Open them, shut them
Open them, shut them
Lay them in your lap-lap-lap
Creep them, creep them, creep them, creep them
Right up to your chin-chin-chin
Open up your little mouth…
But do not let them in!
Sugar Babies (action rhyme)
Roll, roll sugar babies
Roll, roll sugar babies
Push! Pull! Clap-clap-clap!
“ “
Hot! Cold! Clap-clap-clap!
“ “
Up! Down! Clap-clap-clap!
Little Bird (action song/bounce)
Tune: Twinkle, Twinkle Little Star
I saw a little bird go hop-hop-hop
I asked that little bird to stop-stop-stop
I went to the window to say: How do you do?
He wagged his little tail at me and away he flew!
Popcorn (bounce)
Popcorn, Popcorn
Sizzling in the pan
Shake it up, shake it up
Bam! Bam! Bam!
Popcorn, Popcorn
Now it’s getting hot
Shake it up, shake it up
Pop! Pop! Pop!
Colors in the Air (prop song)
Colors, colors
Colors, colors
Floating in the air!
Floating in the air!
Red, Orange, Yellow
Green, Blue, Purple
Floating in the air!
Floating in the air!
Goodbye Rhyme (action rhyme)
This is big, big, big
And this is small, small, small
This is short, short, short
And this is tall, tall, tall!
This is fast, fast, fast
And this is slow, slow, slow
This is yes, yes, yes
And this is no, no, no
This is hi, hi, hi
And this is bye, bye, bye!
Wacky Art: Windsock Craft
By Meredith Brustlin, CMNH Educator
I love this windsock craft! It’s an art project that is accessible to all ages and abilities - and you get to sneak in a little bit of science. Here’s how to make your own windsock:
Materials Needed:
- Paper (printer paper, cardstock, construction paper, etc)
- Markers or crayons
- Crepe paper streamers or tissue paper cut into long strips
- Tape or glue
- A stapler
- A hole punch or scissors
- String or yarn
Directions:
- Invite little ones to decorate their piece of paper with the markers or crayons. If you have stickers or stamps, you could use those, too!
- Once their paper is all decorated, flip it over so that you are looking at the back
- Tape or glue the streamers onto the bottom end of the paper
- If you used glue, give it a few minutes to dry
- Pick up the paper and curl it into a tube/windsock shape
- Staple on the top and the bottom
- Hole punch or cut small holes on either side of the top
- Put your string through the holes
- Hang up your windsock!
The Science:
- The science behind windsocks is pretty simple...if you put your windsock outside, you’ll be able to tell a few things:
- If the wind is blowing
- How much the wind is blowing
- Which direction the wind is coming from!