The Museum Blog
Category: Enriching Experiences
Upcycled CD Scratch Art
by Meredith Brustlin, CMNH Educator
This is a super cool activity that can be done with materials you have at home that you may have thrown away otherwise!
I like this activity because it also introduces an easy way to talk to your little ones about recycling and upcycling. You could start this activity with a short discussion. What does it mean to recycle? What do we recycle in our house?
What do you think it means to UPcycle? This word will probably be new to them! When we recycle, we take items like plastic bottles and send them to the recycling center. From there, they are melted down to become the same item again or something new and different! Did you know plastic bottles can be recycled to become fleece jackets, carpets, and sleeping bags?!
UPcycling is taking something just as it is (in our case here, a CD) and turning it into something fun and new using just our hands and our creative minds! Upcycling projects tend to become beautiful works of art. Ask your little ones if they have upcycled anything before? Or maybe projects you’ve done together as a family? Projects they may be familiar with would be things like tire swings or milk carton birdhouses.
Enjoy exploring upcycled CD scratch art together!
Materials Needed:
- Old CDs or DVDs (it’s fine if they’re all scratched up!)
- Check out your desk for old computer software--the CD I used was an ancient program from the digital camera I had in college!
- ACRYLIC paint!
- I know it’s not washable which is tough with little ones--but it does need to be acrylic for this project so it sticks to the CD.
- Items to scratch the CD with
- Chopsticks, forks, keys, paperclips, etc.
- Some kind of string or ribbon if you would like to hang up your scratch art CD!
Directions:
- Invite little ones to paint their CDs!
- Be sure to paint on the shiny side of the CD, not the side with writing/text.
- It’s best to paint the CDs one color, or blocks of color. Since the idea is to create scratch art on the CDs, if you paint pictures of flowers or dogs or houses---they will look odd after you have also added scratch art to them.
- This is the hard part--wait for the paint on the CDs to totally dry.
- If you have enough CDs, you can experiment with scratching them while they are still wet and then compare with the CDs you scratch when they are dry.
- Once the CDs are dry, use the scratch tools to create designs on them!
- Add a string or ribbon and hang your CD in a window to create a beautiful suncatcher!
Science Magic: Dancing Popcorn!
by Meredith Brustlin, CMNH Educator
We had a great response to our last science magic video (Plastic Bag Polymers!) so decided to share another!
Dancing Popcorn Magic
Materials Needed:
- Clear plastic cup/tall container or clear glass cup/jar
- White vinegar
- Baking soda
- Unpopped popcorn
- A spoon
Directions (prep):
- Fill your clear container about ½ way with water
- Put vinegar in a smaller cup
- Put baking soda in a small cup with the spoon
- Place unpopped popcorn in another small bowl
Directions (activity):
- Tell your young scientists that today you are going to make some popcorn DANCE using science!
- Invite them to put a few spoonfuls of baking soda in the cup of water and stir until it has fully dissolved
- Add a couple spoonfuls of popcorn to the baking soda mixture. Is it dancing yet?
- Make a hypothesis--what will happen when we add the vinegar?
- Carefully & slowly add the vinegar to the baking soda solution
- What happens?!
- You will notice that the popcorn starts to DANCE!
The Science:
- This science magic is created using a simple chemical reaction. When we add vinegar & baking soda together--we create carbon dioxide.
- You can see this at work! If you watch the popcorn carefully, you’ll notice that it gets covered in little bubbles and it bobs up and down.
- Those bubbles are made of carbon dioxide. As they collect on the popcorn, it lifts the popcorn up to the top of the container. Once it is at the top, some of those bubbles “pop” and bring the popcorn back down again.
- This up and down motion is what makes the popcorn look like it is dancing!
First Friends: Spring & Bunnies!
by Meredith Brustlin, CMNH Educator
This week I shared songs and rhymes about springtime and bunnies!
Hello Song:
Hello it’s time to play
Let’s have some fun today!
Let’s clap our hands
And wiggle our toes
A hug...and a kiss...and away we go!
Hello (insert name here) it’s time to play
We’ll have so much fun...hooray!
Open Them/Shut Them (action song)
Open them, shut them
Open them, shut them
Give a little clap-clap-clap
Open them, shut them
Open them, shut them
Lay them in your lap-lap-lap
Creep them, creep them, creep them, creep them
Right up to your chin-chin-chin
Open up your little mouth…
But do not let them in!
Hurry, Scurry, Little Bunny (action rhyme/tickle)
Hurry, scurry, little bunny
Starts down at your toes…
Hurry, scurry, little bunny
Past your knees he goes...
Hurry, scurry, little bunny
Past where your tummy is…
Hurry, scurry, little bunny…
Gives you a bunny kiss!
Splash! Fall the raindrops (action rhyme)
Splash fall the raindrops (clap hands together softly)
To the ground they go (tap on the floor)
We need raindrops (wiggle fingers down from the “sky”)
To help the flowers grow! (stretch up high!)
I bounce you here! (bounce)
I bounce you here,
I bounce you there,
I bounce you, bounce you everywhere!
I hug you here,
I hug you there,
I hug you, hug you everywhere!
I tickle you here,
I tickle you there,
I tickle you, tickle you everywhere!
Little Bunny, Little Bunny (action song)
Little bunny, little bunny, turn around
Little bunny, little bunny, touch the ground!
Little bunny, little bunny, reach up high
Little bunny, little bunny, touch the sky!
Little bunny, little bunny, show your shoe
Little bunny, little bunny, I love you!
Little bunny, little bunny, slap your knees
Little bunny, little bunny, sit down please!
Everyone can shake! (prop song)
Everyone can shake shake shake
Everyone can shake shake shake
Everyone can shake shake shake
And now it’s time to stop!
Everyone can tap tap tap
Everyone can tap tap tap
Everyone can tap tap tap
And now it’s time to stop!
Everyone can clap clap clap
Everyone can clap clap clap
Everyone can clap clap clap
And now it’s time to stop!
Everyone can wave, wave, wave
Everyone can wave, wave, wave
Everyone can wave, wave, wave
And now it’s time to stop!
Put a shaker in your hand! (prop song)
C’mon everybody put a shaker in your hand,
A shaker in your hand, a shaker in your hand!
C’mon everybody put a shaker in your hand,
Let’s see how we shake, shake, shake!
C’mon everybody shake your shaker way up high
C’mon everybody shake your shaker way up high,
C’mon everybody shake your shaker way down loooowwwww
Let’s see how we shake, shake, shake!
Shaker...fast/slow
Shaker...loud/soft
Goodbye Rhyme (action rhyme)
This is big, big, big
And this is small, small, small
This is short, short, short
And this is tall, tall, tall!
This is fast, fast, fast
And this is slow, slow, slow
This is yes, yes, yes
And this is no, no, no
This is hi, hi, hi
And this is bye, bye, bye!
Bunny Art - Two Ways!
By Meredith Brustlin, CMNH Educator
Hi everyone! I have a fun springtime bunny painting project to share with you today. This is a typical example of an activity we would do at the museum as part of our Wacky Art Wednesday program.
I tend to pick activities that are process based instead of product based. This is something you could keep in mind when choosing activities to do with your young ones while you’re home, too and try to alternate some between process and product based activities. Here’s how you can tell the difference...
A product-based activity is one where you have a clear end product in mind. Activities that fall in this category are typically more “crafty”. An example would be something like this (very cute!) paper chick craft:
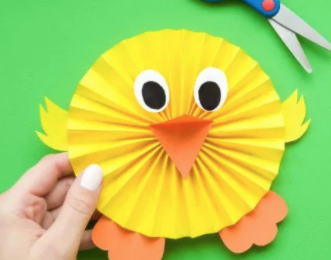
You (the adult) would have the pieces ready to go, and your child would go through the steps of assembling them to look like the example.
There is NOTHING wrong with doing product based projects once in a while! It’s a terrific opportunity for little ones to follow directions, achieve a goal they have in mind, and usually make something very cute!
A process-based activity focuses mostly on...the process! These tend to be a bit on the messier side and align more closely with “art” rather than something that is “crafty”. An example would be something like this project where they explored painting with cleaning brushes:
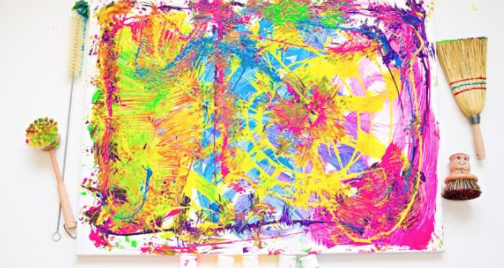
It’s all about the process and the unique experience! While I think the painting above came out looking very cool--that’s not the goal. The goal is to explore and create and focus on what you’re doing and how it works, rather than the end product. These kinds of projects foster creativity, promote conversation, and also tend to take a bit more time than a product focused activity.
Our activity today - Bunny Art two ways - does a nice job combining process and product. You can either do this as a collage project with magazine strips or as a painting project - it’s up to you!
Here’s what you will need to begin:
If you’re painting...
- A piece of cardstock or construction paper
- Clothespins & cotton balls
- This is just a unique way to paint. Clip the cotton ball onto the clothespin and use it to “dot” paint all over your paper. You could, of course, also use a paintbrush!
- Paints
- A cut-out of a bunny
- I printed a bunny silhouette from the internet and then just cut out the silhouette part so that my paper was left with just the shape of the bunny
- A stapler or tape
- A glue stick or white glue
- A cotton ball
If you’re collaging…
- A piece of cardstock or construction paper
- Magazines cut into small strips
- A glue stick or Mod Podge
- A cut-out of a bunny
- See note above about the bunny!
- A stapler or tape
- A cotton ball
The activity:
- Have your child paint or collage all over a piece of cardstock
- They can decorate the whole thing or just a section in the middle
- When they have finished creating and their art has dried, put the negative cut-out of the bunny on top of their paper
- Part of their art will show through behind the bunny and make a very lovely piece of art!
- Glue on the cotton ball to make the bunny’s fluffy tail!
These could be used as special springtime cards for loved ones, or used to decorate windows!
Watch the video above to see examples of both kinds of projects!
Tinker Time: All About Spring!
by Meredith Brustlin, CMNH Educator
Sorting:
- Place a variety of colors of plastic eggs in a container
- Place pieces of colored paper, or paper with a color drawn on them, around the container
- Invite little ones to sort them by color!
- Want an extra challenge? Try making some plastic egg patterns!
Cause & Effect:
- Find something to make a ramp
- I used a 3-ring binder, but you could find a piece of wood, cookie sheet, or piece of flat cardboard
- Collect a few books to add to the ramp and give it some additional height
- Find a car or two
- I tied a tiny bunny stuffed animal to my car--this is fun, but not necessary!
- Gather a variety of different textured materials
- Tin foil, bubble wrap, felt, sandpaper, etc.
- Invite little ones to experiment with the ramp!
- Try racing the car down the ramp without any texture on it
- Add different textures and see how the movement of the car changes
- Add some height to the ramp and try again with the different textures
- Ask questions!
- What is happening?
- How does the movement of the car change?
- Why do you think it changes?
- What else could we add/change?
Sensory:
- Gather a bunch of plastic eggs
- Fill up the eggs with a variety of materials
- Unpopped popcorn, coins, buttons, paper clips, etc
- As an extra precaution, you could put a small piece of tape to keep the eggs closed during investigation!
- Make sure each egg has a sound match, aka two eggs of each sound
- Invite little ones to try and match the sounds!
Art:
- Find a paper towel tube
- Cut it into three pieces
- Leave one piece a circle
- Smoosh the other two pieces to make ovals
- Use the paper pieces to make a bunny stamp!
Shiny Penny Experiment
By Colie Haahr, CMNH Educator
We were surprised by how excited kids got about cleaning pennies when we offered this experiment as a drop in STEAM activity at CMNH! It does seem like a magic trick when you first see the pennies getting shinier almost instantly.
This experiment is a good way to practice making predictions and observations, and it’s an easy one to do with materials that are available at home! For kids learning about money and currency, this is a great way to practice counting and recognizing the different coins as well.
Materials:
- Table cover of some kind (a trash bag works!)
- Several pennies
- Other coins- quarter, nickel, dime, coins from other countries if available
- Vinegar
- Salt
- Bowl of water
- Bowl for vinegar and salt mixture
- Q-tips
- Paper towels
- Optional: lemon juice, soapy water, other liquids you would like to experiment with
Directions:
- One way to set this experiment up is to use a muffin tin or small bowls to offer several different liquids for kids to try. A small pallet for paint works well, too!
- Put the coins on a surface you do not mind getting messy- plastic plate, paper towel, or directly on the table covering, but you will want some paper towels or dish towels nearby
- Allow kids to experiment with the materials to see what would work best to clean the different coins by dipping the coins in the liquid, and brushing them with a q-tip
- Ask what they think will work best, and why?
- After some experimentation, guide them toward the vinegar or lemon juice mixed with salt. The salt works as a mild abrasive, and the acid in the vinegar and lemon juice react with the pennies to make them shiny and new looking
- Important: rinse the pennies in water after cleaning them if you would like to keep them nice and shiny! They will oxidize and turn green otherwise.
- Fun fact: this is what happened to the statue of liberty, and why it looks green today! Kids did not dip it into a bowl of vinegar, but the statue is copper, and it turned green because of oxidation over time.
- Ask why the acidic liquids cleaned the pennies, but not the other coins? What is different about them? The pennies are a different color because they are made of a different material: copper!
What’s Happening?
Pennies are made of copper, and copper is shiny, but over time it becomes tarnished and appears black or brown because of copper oxide, which is created when copper bonds with oxygen. Acids mixed with salt help break down the copper oxide on the penny. Vinegar may remove actual dirt from the pennies and other coins because it works well as a cleaner!
Extensions:
Science Bob offers a few more experiments you can try using the same materials.
Scientific American offers some ideas for different liquids to use, and a more in depth explanation and method for advanced experiment-ers.
First Friends Songs About Bugs & Insects
By Meredith Brustlin, CMNH Educator
Even if it’s rainy and gross outside, we can PRETEND it’s Spring, right? That’s why I shared songs/rhymes about bugs & insects this week!
Hello Song:
Hello it’s time to play
Let’s have some fun today!
Let’s clap our hands
And wiggle our toes
A hug...and a kiss...and away we go!
Hello (insert name here) it’s time to play
We’ll have so much fun...hooray!
Open Them/Shut Them (action song)
Open them, shut them
Open them, shut them
Give a little clap-clap-clap
Open them, shut them
Open them, shut them
Lay them in your lap-lap-lap
Creep them, creep them, creep them, creep them
Right up to your chin-chin-chin
Open up your little mouth…
But do not let them in!
Beehive (action rhyme)
Here is the beehive
But where are the bees?
Hiding inside where nobody sees!
Soon they’ll come buzzing out of the hive…
One! Two! Three! Four! Five!
Buzzzzzzzzzz!
I’m a little Beetle (bounce)
I’m a little beetle and I wiggle all day
If you get too close to me I’ll FLY away!
I’m a little bumble bee and I wiggle all day
If you get too close to me I’ll FLY away!
I’m a little lady bug and I wiggle all day
If you get too close to me I’ll FLY away!
I’m a little dragon fly and I wiggle all day
If you get too close to me I’ll FLY away!
Sleepy Bumble Bees (song/movement)
See the little bumble bees sleeping ‘til it’s nearly noon
Shall we wake them with a merry tune?
They’re so still...are they ill?!
No! Wake up bumble bees!
Hop little bumble bees hop, hop, hop
Hop little bumble bees hop, hop, hop
Hop little bumble bees hop, hop, hop
Hop, hop, hop aaaaaaaand...stop!
“ “
Jump little bumble bees!
“ “
Dance little bumble bees!
Popcorn (prop song)
Popcorn, popcorn (Wave your scarf!)
Popcorn, popcorn
In the pot, in the pot (Hide your scarf in your hands)
Shake them, shake them, shake them (shake shake shake!)
Shake them, shake them, shake them
‘Til they pop! ‘Til they pop! (Throw scarf in the air!)
Scarf Opposites (prop song)
Wave your scarf up high,
Wave your scarf up high,
Wave it up high! Wave it up high!
Wave your scarf down looowwwwww
Wave your scarf down looowwwwww
Wave your scarf! Wave your scarf!
Wave your scarf fast/slow
Wave your scarf in front/behind
Wave your scarf a little/a lot!
Goodbye Rhyme (action rhyme)
This is big, big, big
And this is small, small, small
This is short, short, short
And this is tall, tall, tall!
This is fast, fast, fast
And this is slow, slow, slow
This is yes, yes, yes
And this is no, no, no
This is hi, hi, hi
And this is bye, bye, bye!
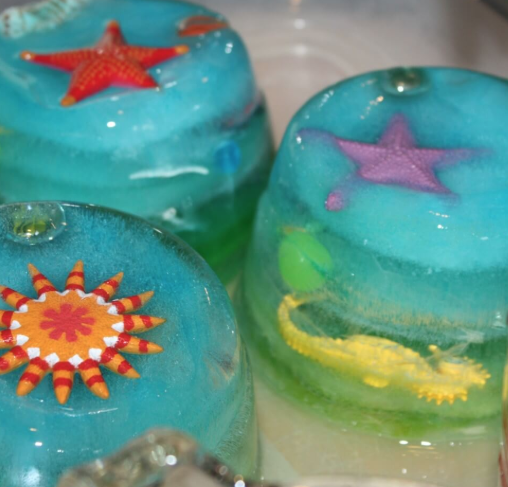
Ice Exploration!
By Meredith Brustlin, CMNH Educator
Materials Needed:
- Bowl(s) or container(s) that are freezer safe
- Fun items/trinkets to freeze (small plastic toys, rocks, coins, etc)
- Food coloring (optional, if you want colorful ice)
- Spray bottle
- Salt
Directions (prep):
- Collect small trinkets and items from around the house and place them in a bowl or container
- Fill the bowl or container with water
- Add food coloring, if desired
- Freeze at least overnight (depending on the size of your container)
- Fill a spray bottle with water & a few spoonfuls of salt, shake!
Directions (activity):
- Take the container out of the freezer and turn it upside down on a cookie sheet, tray, or large dish
- Once the ice has unstuck from the container, remove the container and invite your young scientists to play!
- Direct them to spray the ice with the spray bottle. You can also have some other salt available that they can use to help melt the ice.
- Try to free some of the trinkets!
The Science:
- There are so many angles that you can take for discussing the science of this project.
- The water: it changes from a liquid to a solid when we put it in the freezer! While you melt the ice with the salt water, it changes back into a liquid again! That’s two states of matter, can it become a gas? (Yes! Water vapor!)
- The melting: Salt lowers the freezing point of water. Ice melts faster when salt is added as the salt lowers the freezing point of the ice, this is known as freezing point depression. The more salt you add the lower the freezing point. This is why we use salt on roads in the winter to help melt the ice and make them safe!
The following Wee Ones video is designed for preschoolers and is all about "Melting" and would make a good video to watch together while doing this experiment!