The Museum Blog
Category: Homeschool Science
Spooky Science: Frankenstein's Hand and Fizzy Pumpkin Art
by Colie Haahr, CMNH Educator
In this Spooky Science Video we make Frankenstein's "hand" come to life with a simple chemical reaction! We also demonstrated an art project using the same materials to make fizzy pumpkin art. Most of the materials for this project can be found at home, and though it's a bit messy, these are both activities that children can try on their own with just little help from a grown-up.
Frankenstein's Hand Experiment
Materials needed:
- Cup
- Disposable glove
- Baking soda
- Lemon juice or vinegar
- Tray or pan
- Scoop or spoon
Set up:
Put all the materials on a tray or another surface that can get wet. This is a good activity to try outside for an easier clean up. The ingredients we are using are actually used for cleaning, which means they should not stain surfaces. A tray is best if you have one. If desired you can pour the lemon juice or vinegar into the cup ahead of time, or children can help with this step.
Experiment:
- Place the cup on the tray, and fill it about ¼ of the way up with lemon juice or vinegar- this experiment works with either one
- Use a spoon to place a few scoops of baking soda into the glove
- Shake the glove so that the baking soda moves down to the fingertips
- Carefully place the glove on top of the cup by stretching the elastic opening of the glove around the mouth of the cup- the fingertips should be hanging down still
- Be sure there’s a tight seal between the glove and cup- if not, hold the glove in place
- Tip the glove upright so that the baking soda drops down from the fingertips into the cup
- Watch the glove! It should start to inflate quickly as the baking soda reacts with the lemon juice inside the cup
Optional Alternative way to do this experiment:
If you do not have a glove handy you can also do this same experiment with a balloon and a plastic bottle. First, draw a face on the balloon, so that when it expands you will have a funny face or monster face on your project. The rest of the steps are the same, except you are placing the baking soda in the balloon, and carefully attaching it to the top of the water bottle. The reaction will be the same as well- the balloon will magically inflate on its own! The Children’s Museum of Indianapolis shared a video of this version of the experiment: Monster Balloon Experiment. Another resource for this experiment comes from Scholastic: Fizzy Balloon Experiment
How does it work?
Lemon juice is acidic and baking soda is a base, and when acids and bases mix together, they fizz up! You created a chemical reaction inside the cup: you mixed together a liquid and a solid, and released a gas: carbon dioxide. When you add the baking soda to the lemon juice the gas starts to move out of the cup, but the glove is blocking it from escaping. The glove inflates from the gas, and will stay inflated while the reaction continues to happen. This experiment is fun because you can “see” the gas that’s created by trapping it inside the glove. Usually, we can’t see the gas that is released from a baking soda and vinegar (or lemon juice) experiment.
Fizzy Pumpkin Art
Materials:
- Tray or placemat to work on
- Orange food coloring or liquid watercolor (mix yellow and red to make orange if needed)
- Lemon juice or vinegar
- Baking soda
- Pipette or spoon
- Pumpkin template- or draw your own with a permanent marker- works best on cardstock. Here are a few free printable pumpkin templates from FirstPallete.com: Medium Sized Pumpkin Template, Large Pumpkin Template
Set Up:
Place the pumpkin template on the tray or work surface. If you would like, use a permanent marker to draw a jack-o-lantern face on the pumpkin. Pour the lemon juice or vinegar into a cup and add the orange food coloring. If you do not have orange, mix red and yellow food coloring together to make it. Keep in mind that the color will become lighter when it mixes with the white baking soda. Spread a light layer of baking soda over the pumpkin image.
Activity Instructions:
- Once everything is set up, use the pipette to add lemon juice to the pumpkin picture
- You should see the baking soda on the pumpkin starting to fizz up! Continue to add lemon juice or vinegar until the fizzing stops
- Let your project dry, and it will become a nice art project. If there is too much liquid on the picture, either use the pipette to remove some, or gently shake it off
- Once dry, you can gently brush off any excess baking soda that is left.
- This activity uses the same ingredients as the experiment, and the chemical reaction is the same. The only difference is that we added some color to the lemon juice or vinegar, so just keep in mind that this will need more clean up, and that food coloring may stain surfaces or clothing.
Spooky Science: Bat Rockets
by Colie Haahr, CMNH Educator
We did a mini rocket experiment for this Spooky Science video, and made a bat straw rocket. You can try both at home! For the mini bat rocket, it's important to have supervision and assistance from a grown up. This experiment uses medicine, and children should not try this without help from a grown up.
Bat Rocket Experiment:
Materials needed:
- Alka seltzer or similar effervescent medicine
- A film canister with a tight fitting lid
- Water
- Optional: a bat to add to your rocket. We used a laminated picture in the video
Set up:
Set up outside or use a tray indoors in an area that's easy to clean up
Experiment:
This experiment happens quickly! So make sure all eyes are on the rocket once the ingredients are inside.
Break off a piece of the alka seltzer and place it inside the film canister. Add water filling the container less than half way. Quickly replace the lid of the canister, and flip it over so that the lid is on the ground (or tray). Wait less than a minute, and the canister will launch into the air!
How does it work?
The alka seltzer mixes with water and creates bubbles. Another way to describe it is that a solid and a liquid mix together and create a gas. In the small canister there is only so much space for the water and the bubbles to fit, so the pressure from the bubbles pushes the canister up into the air! The bubbles are carbon dioxide gas, and as the gas is trying to escape and has nowhere to go, it pushes the lid off of the canister. Since the canister was placed upside down, the canister flies up into the air rather than the lid just flying off (that will happen if the canister is placed right side up!). This experiment is similar to a baking soda and vinegar experiment, and that's because some of the same ingredients are in the alka seltzer- citric acid and sodium bicarbonate.
Bat Straw Rocket Activity:
For a less messy version of bat rocket fun, try making a bat straw rocket!
Materials needed:
- Cardstock
- Bat template
- Pipette
- Tape
- Scissors
- Straw
Instructions:
- First, print the bat template on the cardstock, or use a permanent marker to draw a bat
- Color the bat in with markers or crayons, and cut it out
- Cut a pipette so that the larger end can be used for the rocket (the part you squeeze)
- Tape the pipette piece onto the back of the bat cut out
- Place the pipette piece onto a straw- this can be a reusable straw, paper straw, or plastic straw
- Blow into the straw with is angles slightly upward- the bat should "fly" off of the straw
How does it work?
The pipette piece is closed off at the top, so when you blow into the straw, the air has nowhere to go. The pressure from blowing into the straw makes the bat fly off the straw, and go through the air for a bit!
We first learned about this activity from Bug and Buddy, and they have a free printable bat template that can be used for this project. There are also some great pictures of the process to make the rockets, and a video. See the link in the reference section below! This activity involves pressure and forces similar to the bat rocket experiment, but it is less messy and can be tried over and over again. Have fun!
References:
https://www.imaginationstationtoledo.org/education-resources/diy-activities/alka-seltzer-rockets/
Walking Rainbow Experiment
By Meredith Brustlin, CMNH Educator
We share a lot of different science experiment projects at CMNH. Many of these experiments have instant results - things like vinegar and baking soda bubbling, popcorn dancing, and invisible ink appearing. What I really like about this “walking rainbow” experiment is that it takes some time to see the results (as in, it takes hours to fully see the results!) Although it may not be as exciting in the moment, it is a perfect experiment to practice making predictions and thinking like a scientist. It really gives young scientists time to think and hypothesize and even change their guesses throughout the day.
To make your own rainbow you will need:
- 7 clear cups--these can be glass or plastic, just make sure they are perfectly clear (not colorful)
- Water
- 6 paper towel pieces (this could be three large sheets cut in half, or 6 of the little half sheets)
- Primary colors of food coloring or liquid watercolor
Set-up:
- Set out the 7 cups in a line
- Fill cups 1, 3, 5, & 7 about halfway with water
- Leave cups 2, 4, & 6 empty
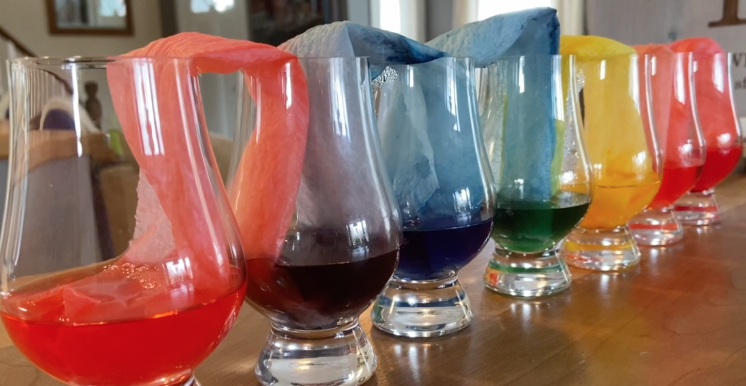
- Fold your six paper towel pieces in half lengthwise and then in half again. Take that long skinny strip and fold it in half so that it can stand up in the cups (pictured above)
- Invite young scientists to help you add some food coloring to the cups.
- Ask them--what is the first color of the rainbow? Red! Add about 6 drops of red food coloring to the first cup.
- What is the second color? Orange! That cup is empty though, so we will skip that one.
- Add yellow to the 3rd cup
- Skip the 4th cup (green)
- Add blue to the 5th cup
- Skip the 6th cup (purple)
- Add red to the 7th cup and ask your scientists why they think you may have done that…!
- Next, carefully place your paper towel pieces in between each cup so that they are resting in the colorful water.
That’s it for set up! Now it’s time to think like a scientist!
Ask your young scientists…
- What do you think will happen with the cups?
- Why do you think we left some cups empty?
- What do you know about primary colors?
- How do you think what you know about primary colors (that they make secondary colors) will come into play in this experiment?
- What do you notice is already happening with the paper towel pieces and the water?
Feel free to have your scientists write or draw what they are seeing!
This experiment will take awhile to completely finish and make the rainbow design. It’s a good idea to either do this experiment at night before bedtime, make some predictions, and then wake up and see the walking water rainbow. You could also do this experiment first thing in the morning and then watch it change all day long!
Have fun making a walking rainbow and thinking like scientists!
Make Seed Flyers
by Meredith Brustlin, CMNH Educator
This week, all of our online programming will focus on the earth and being environmentally friendly!
Try making seed flyers this week. These are fun to make and fun to throw or plant! Plus, the wildflower seeds that you use to create them will be helpful to your neighborhood pollinators.
Materials Needed:
- Newspaper or construction paper (torn into small pieces)
- Water
- A blender or food processor
- Wildflower seeds
- Mini muffin tin (optional)
Directions:
- Start by tearing up your paper into small pieces
- Put the pieces in a bowl or a couple different bowls
- Pour water over your paper pieces and allow them to soak
- This will take about 20 minutes with construction paper and less time with newspaper
- Once your paper is soaked, add it to your food processor or blender
- Process or blend until the paper is fully broken down
- Now it’s time to make your seed bombs!
- Smush the paper into your muffin tin or use your hands to smush the paper into spheres
- If using the muffin tin, put a layer of paper and then sprinkle some seeds on top, then add another layer of paper on top of that and smush it all down
- If using your hands, put some paper and seeds into your hands and then roll into balls
- Let your seed flyers dry
- Let them dry for a few hours in the muffin tin (if you used one)
- Once they’re a bit dry, transfer them to a drying rack and let them fully dry overnight
Now what do you do?!
- When seed planting season starts...plant your seed flyers! Or, as the name implies, THROW THEM and see them fly through the air! They will land and start to work their way into the soil.
Thank you to our Earth Day week sponsor, D. F. Richard!
Foil Boats Science Challenge
by Meredith Brustlin, CMNH Educator
Materials needed:
- One piece of aluminum foil per young scientist/participant (roughly the size of a standard piece of paper) Make sure all participants have the same size piece of foil.
- Sink/tub/plastic bin with about 6 inches of water in it
- Weights to put in your boat (pennis work great for this!)
- Optional: other building materials
- Cardboard, tape, straws, popsicle sticks, etc
Directions (prep):
- Fill up your water station (sink/tub/plastic bin)
- Prep materials for each scientist participant--make sure they all have the same materials to use for their project
- Collect boat weights (ex. pennies)
Directions (activity):
- Explain to your young scientist(s) that today you will be making boats!
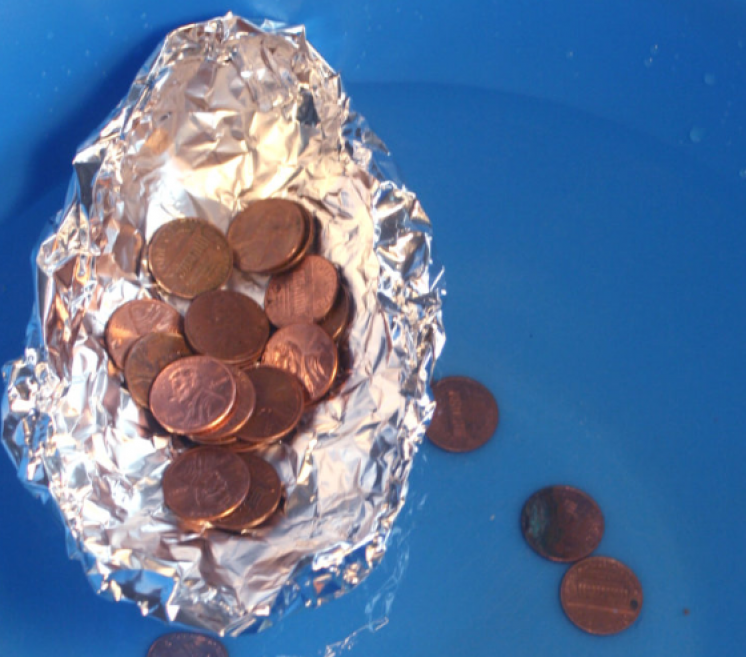
- Challenge them to make a boat that they think will hold the most weight and not sink using the materials provided
- Test your boats by putting them in the water and gradually adding weight!
- Feel free to re-design and test again.
The Science:
- We are seeing two forces at work in this science experiment: gravity and buoyancy!
- Gravity: gravity is trying to pull your boat and pennies downward towards the center of the earth
- Buoyancy: buoyancy is pushing the boat towards the surface of the water!
- Your boat will float if the force of buoyancy is greater than the force of gravity.
Science Explorers for Homeschoolers: Water!
 By Meredith Lamothe
Welcome to the Science Explorers for Homeschoolers blog!
We will share here some of the projects, experiments and concepts that we explore in the Science Explorers for Homeschoolers classes, which are designed for ages 6-10.
Keep learning, Keep exploring.
Science Explorers for Homeschoolers: Water!
Water is amazing. Everything that is alive depends on water. Water can exist in THREE different states. Some things float in water, while other sink. There's so much to learn and experiment with when it comes to water.
SCIENTIFIC METHOD
Always start with the essentials! The Scientific Method is what scientists of every age use to learn things. There are four steps:
- Come up with a question.
- Observe and gather information to come up with a guess (hypothesis)
- Run an experiment to test your guess.
- Come up with an answer to your question.
For example you can use baking cookies as you go through the four steps.
- What will happen to this cookie dough when I put it in the over and bake it?
- Come up with a guess based on your observations.
- Experiment by putting the cookies in the oven.
- Come up with an answer to your question!
SINK OR FLOAT?
Try this, put an egg into a cup of water and observe what it does. Does it sank to the bottom? Does it float or have buoyancy (otherwise known as "bouncy buoyancy"? Now gradually add salt to the water. Eventually, after A LOT of salt is added, the egg will float to the top! When the egg was first put into the water it had a greater density than the water, so it sank. When salt was added to the water–it increased the density so that the egg was pushed up (buoyancy) and floated to the top of the glass.
Another great way of testing density is to make glitter tubes. We found that instead of floating or sinking, the glitter sailed along in the water, much like a feather floating in the air. This is because the glitter and the water have very similar density.