The Museum Blog
Category: Learning
Tinker Time: Earth Day
by Meredith Brustlin, CMNH Educator
This week’s Tinker Time was inspired by Earth Day! These activities are all easy to do with materials that you probably have in your household recycling bin or trash can. Try out one or two and let us know what you think!
Sensory: Cork Boats
- Gather your materials: three wine corks, two rubber bands or hair ties (or duct tape!), a straw or craft stick, a piece of paper, scissors.
- Assemble your boat!
- Rubber band the three corks together so they form a raft-like structure
- Wiggle the straw or craft stick between two of the corks
- Cut your piece of paper into a triangle and decorate
- Cut two slits on your triangle so you can slide it onto the straw or craft stick to become a sail!
- Have some sensory fun playing with the boat in the water!
Building: Egg carton building blocks
- Cut egg cartons into small sections (the parts that hold the eggs!)
- Optional: color or paint the egg carton pieces
- Explore using the egg carton pieces as building blocks!
Sorting: Old crayons become new!
- Place liners in mini or regular muffin tin
- You can also use silicone shape molds, if you have them!
- Sort old broken crayons by color into the different sections of the tin
- Bake the crayons for ~12 minutes at 250 degrees
- Don’t go too far away--keep an eye on them and make sure to take them out if they start smoking!
- Let your “new” crayons cool completely and then gently ease them out of their cupcake liners
- Use your new & improved giant crayons!
Art: Jar lid banjo
- Find a jar lid
- Place some rubber bands around the lid
- Tape a handle of some kind--a craft stick, paint stirrer, or piece of paper towel tube
- Decorate!
- Play your jar lid banjo!
Thank you to our Earth Day week sponsor, D. F. Richard!
Make Recycled Paper Beads
by Meredith Brustlin, CMNH Educator
This is such an easy and fun project and is a perfect one to do during Earth Day week!
Materials Needed:
- Magazines or other scrap paper
- Pencils
- A glue stick
- String
- Mod Podge or DIY Mod Podge (white glue mixed with water)
- This is optional!
Directions:
- Prep this activity by cutting magazines or other scrap paper into long skinny triangles
- Cut the paper vertically to make the longest triangles possible!
- Starting with the wide end of one of your triangles, start rolling it tightly around a pencil
- Sometimes little ones need help with this beginning step!
- Keep rolling until you are about 2” from the end of the triangle--it should just be a skinny little strip left
- Cover that strip with glue and continue rolling to complete your bead
- Wiggle the bead off your pencil
- Make more beads!
- String your beads to make a necklace or bracelet.
If you’d like, when you’re finished with your beads--you can paint them with Mod Podge and let them dry. This will make your beads more secure and sturdy and also make them shiny!
Make Seed Flyers
by Meredith Brustlin, CMNH Educator
This week, all of our online programming will focus on the earth and being environmentally friendly!
Try making seed flyers this week. These are fun to make and fun to throw or plant! Plus, the wildflower seeds that you use to create them will be helpful to your neighborhood pollinators.
Materials Needed:
- Newspaper or construction paper (torn into small pieces)
- Water
- A blender or food processor
- Wildflower seeds
- Mini muffin tin (optional)
Directions:
- Start by tearing up your paper into small pieces
- Put the pieces in a bowl or a couple different bowls
- Pour water over your paper pieces and allow them to soak
- This will take about 20 minutes with construction paper and less time with newspaper
- Once your paper is soaked, add it to your food processor or blender
- Process or blend until the paper is fully broken down
- Now it’s time to make your seed bombs!
- Smush the paper into your muffin tin or use your hands to smush the paper into spheres
- If using the muffin tin, put a layer of paper and then sprinkle some seeds on top, then add another layer of paper on top of that and smush it all down
- If using your hands, put some paper and seeds into your hands and then roll into balls
- Let your seed flyers dry
- Let them dry for a few hours in the muffin tin (if you used one)
- Once they’re a bit dry, transfer them to a drying rack and let them fully dry overnight
Now what do you do?!
- When seed planting season starts...plant your seed flyers! Or, as the name implies, THROW THEM and see them fly through the air! They will land and start to work their way into the soil.
Thank you to our Earth Day week sponsor, D. F. Richard!
First Friends: Things that GO!
by Meredith Brustlin, CMNH Educator
Things That GO! Fast and Slow
This week in Baby Storytime we talked about things that GO! And moving fast and slow!
Some of the songs/rhymes this week were repeats from previous videos - but repetition is so important for this age group. When little ones hear the same songs or rhymes over and over again, it becomes extra fun for them because they start to anticipate what comes next and sing/play along. It also helps them with language acquisition and memory skills.
Hello Song:
Hello it’s time to play
Let’s have some fun today!
Let’s clap our hands
And wiggle our toes
A hug...and a kiss...and away we go!
Hello (insert name here) it’s time to play
Hello (insert name here) it’s time to play
Hello (insert name here) it’s time to play
We’ll have so much fun...hooray!
Open Them/Shut Them (action song)
Open them, shut them
Open them, shut them
Give a little clap-clap-clap
Open them, shut them
Open them, shut them
Lay them in your lap-lap-lap
Creep them, creep them, creep them, creep them
Right up to your chin-chin-chin
Open up your little mouth…
But do not let them in!
Sugar Babies (action rhyme)
Roll, roll sugar babies
Roll, roll sugar babies
Push! Pull! Clap-clap-clap!
“ “
Fast! Slow! Clap-clap-clap!
“ “
Up! Down! Clap-clap-clap!
My Little Red Wagon (bounce)
Bouncing up and down in my little red wagon
Bouncing up and down in my little red wagon
Bouncing up and down in my little red wagon
Won’t you be my darling?
Bouncing side to side in my little red wagon
Bouncing side to side in my little red wagon
Bouncing side to side in my little red wagon
Won’t you be my darling?
Bouncing way up high in my little red wagon
Bouncing way up high in my little red wagon
Bouncing way up high in my little red wagon
Won’t you be my darling?
Slowly, Slowly (action rhyme/tickle)
Slowly, slowly, very slowly
Creeps the garden snail
Slowly, slowly, very slowly
Up the wooden rail
Quickly, quickly, very quickly
Runs the little mouse!
Quickly, quickly, very quickly
All around the house!
This is the way the ladies ride (bounce)
This is the way the ladies ride
Trit-trot, trit-trot
This is the way the gentlemen ride
Jiggity-jog, jiggity-jog
This is the way the farmer rides
Hobbildy-hoy, hobbildy-hoy
And this is the way the hunter rides
Gallopy, gallopy, gallopy, gallopy
Oooooooover the fence!
Scarf Peekaboo (prop song)
We wave our scarves together
We wave our scarves together
We wave our scarves together
Because it’s lots of fun!
We wave them up high!
We wave them down low
We wave them over you...peekaboo!
Because it’s lots of fun
We throw our scarves together
We throw our scarves together
We throw our scarves together
Because it’s lots of fun!
We throw them up high!
We throw them down low
We throw them over you...peekaboo!
Because it’s lots of fun!
Goodbye Rhyme (action rhyme)
This is big, big, big
And this is small, small, small
This is short, short, short
And this is tall, tall, tall!
This is fast, fast, fast
And this is slow, slow, slow
This is yes, yes, yes
And this is no, no, no
This is hi, hi, hi
And this is bye, bye, bye!
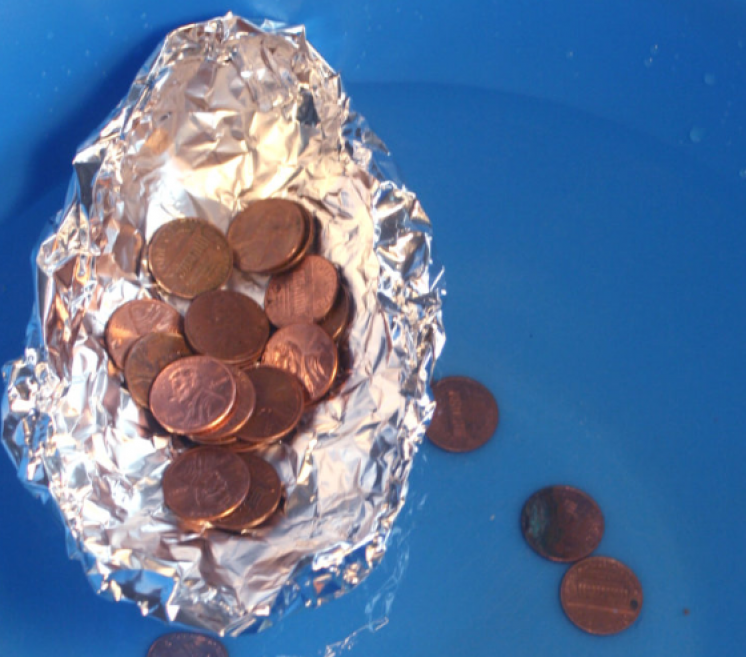
Foil Boats Science Challenge
by Meredith Brustlin, CMNH Educator
Materials needed:
- One piece of aluminum foil per young scientist/participant (roughly the size of a standard piece of paper) Make sure all participants have the same size piece of foil.
- Sink/tub/plastic bin with about 6 inches of water in it
- Weights to put in your boat (pennis work great for this!)
- Optional: other building materials
- Cardboard, tape, straws, popsicle sticks, etc
Directions (prep):
- Fill up your water station (sink/tub/plastic bin)
- Prep materials for each scientist participant--make sure they all have the same materials to use for their project
- Collect boat weights (ex. pennies)
Directions (activity):
- Explain to your young scientist(s) that today you will be making boats!
- Challenge them to make a boat that they think will hold the most weight and not sink using the materials provided
- Test your boats by putting them in the water and gradually adding weight!
- Feel free to re-design and test again.
The Science:
- We are seeing two forces at work in this science experiment: gravity and buoyancy!
- Gravity: gravity is trying to pull your boat and pennies downward towards the center of the earth
- Buoyancy: buoyancy is pushing the boat towards the surface of the water!
- Your boat will float if the force of buoyancy is greater than the force of gravity.
Upcycled CD Scratch Art
by Meredith Brustlin, CMNH Educator
This is a super cool activity that can be done with materials you have at home that you may have thrown away otherwise!
I like this activity because it also introduces an easy way to talk to your little ones about recycling and upcycling. You could start this activity with a short discussion. What does it mean to recycle? What do we recycle in our house?
What do you think it means to UPcycle? This word will probably be new to them! When we recycle, we take items like plastic bottles and send them to the recycling center. From there, they are melted down to become the same item again or something new and different! Did you know plastic bottles can be recycled to become fleece jackets, carpets, and sleeping bags?!
UPcycling is taking something just as it is (in our case here, a CD) and turning it into something fun and new using just our hands and our creative minds! Upcycling projects tend to become beautiful works of art. Ask your little ones if they have upcycled anything before? Or maybe projects you’ve done together as a family? Projects they may be familiar with would be things like tire swings or milk carton birdhouses.
Enjoy exploring upcycled CD scratch art together!
Materials Needed:
- Old CDs or DVDs (it’s fine if they’re all scratched up!)
- Check out your desk for old computer software--the CD I used was an ancient program from the digital camera I had in college!
- ACRYLIC paint!
- I know it’s not washable which is tough with little ones--but it does need to be acrylic for this project so it sticks to the CD.
- Items to scratch the CD with
- Chopsticks, forks, keys, paperclips, etc.
- Some kind of string or ribbon if you would like to hang up your scratch art CD!
Directions:
- Invite little ones to paint their CDs!
- Be sure to paint on the shiny side of the CD, not the side with writing/text.
- It’s best to paint the CDs one color, or blocks of color. Since the idea is to create scratch art on the CDs, if you paint pictures of flowers or dogs or houses---they will look odd after you have also added scratch art to them.
- This is the hard part--wait for the paint on the CDs to totally dry.
- If you have enough CDs, you can experiment with scratching them while they are still wet and then compare with the CDs you scratch when they are dry.
- Once the CDs are dry, use the scratch tools to create designs on them!
- Add a string or ribbon and hang your CD in a window to create a beautiful suncatcher!
Bunny Art - Two Ways!
By Meredith Brustlin, CMNH Educator
Hi everyone! I have a fun springtime bunny painting project to share with you today. This is a typical example of an activity we would do at the museum as part of our Wacky Art Wednesday program.
I tend to pick activities that are process based instead of product based. This is something you could keep in mind when choosing activities to do with your young ones while you’re home, too and try to alternate some between process and product based activities. Here’s how you can tell the difference...
A product-based activity is one where you have a clear end product in mind. Activities that fall in this category are typically more “crafty”. An example would be something like this (very cute!) paper chick craft:
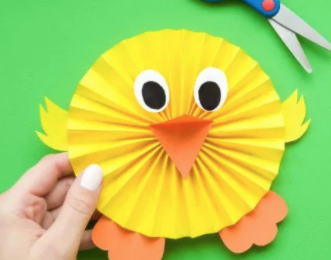
You (the adult) would have the pieces ready to go, and your child would go through the steps of assembling them to look like the example.
There is NOTHING wrong with doing product based projects once in a while! It’s a terrific opportunity for little ones to follow directions, achieve a goal they have in mind, and usually make something very cute!
A process-based activity focuses mostly on...the process! These tend to be a bit on the messier side and align more closely with “art” rather than something that is “crafty”. An example would be something like this project where they explored painting with cleaning brushes:
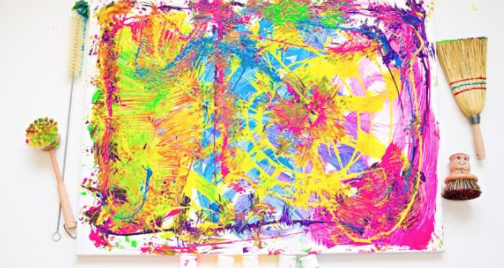
It’s all about the process and the unique experience! While I think the painting above came out looking very cool--that’s not the goal. The goal is to explore and create and focus on what you’re doing and how it works, rather than the end product. These kinds of projects foster creativity, promote conversation, and also tend to take a bit more time than a product focused activity.
Our activity today - Bunny Art two ways - does a nice job combining process and product. You can either do this as a collage project with magazine strips or as a painting project - it’s up to you!
Here’s what you will need to begin:
If you’re painting...
- A piece of cardstock or construction paper
- Clothespins & cotton balls
- This is just a unique way to paint. Clip the cotton ball onto the clothespin and use it to “dot” paint all over your paper. You could, of course, also use a paintbrush!
- Paints
- A cut-out of a bunny
- I printed a bunny silhouette from the internet and then just cut out the silhouette part so that my paper was left with just the shape of the bunny
- A stapler or tape
- A glue stick or white glue
- A cotton ball
If you’re collaging…
- A piece of cardstock or construction paper
- Magazines cut into small strips
- A glue stick or Mod Podge
- A cut-out of a bunny
- See note above about the bunny!
- A stapler or tape
- A cotton ball
The activity:
- Have your child paint or collage all over a piece of cardstock
- They can decorate the whole thing or just a section in the middle
- When they have finished creating and their art has dried, put the negative cut-out of the bunny on top of their paper
- Part of their art will show through behind the bunny and make a very lovely piece of art!
- Glue on the cotton ball to make the bunny’s fluffy tail!
These could be used as special springtime cards for loved ones, or used to decorate windows!
Watch the video above to see examples of both kinds of projects!
Tinker Time: All About Spring!
by Meredith Brustlin, CMNH Educator
Sorting:
- Place a variety of colors of plastic eggs in a container
- Place pieces of colored paper, or paper with a color drawn on them, around the container
- Invite little ones to sort them by color!
- Want an extra challenge? Try making some plastic egg patterns!
Cause & Effect:
- Find something to make a ramp
- I used a 3-ring binder, but you could find a piece of wood, cookie sheet, or piece of flat cardboard
- Collect a few books to add to the ramp and give it some additional height
- Find a car or two
- I tied a tiny bunny stuffed animal to my car--this is fun, but not necessary!
- Gather a variety of different textured materials
- Tin foil, bubble wrap, felt, sandpaper, etc.
- Invite little ones to experiment with the ramp!
- Try racing the car down the ramp without any texture on it
- Add different textures and see how the movement of the car changes
- Add some height to the ramp and try again with the different textures
- Ask questions!
- What is happening?
- How does the movement of the car change?
- Why do you think it changes?
- What else could we add/change?
Sensory:
- Gather a bunch of plastic eggs
- Fill up the eggs with a variety of materials
- Unpopped popcorn, coins, buttons, paper clips, etc
- As an extra precaution, you could put a small piece of tape to keep the eggs closed during investigation!
- Make sure each egg has a sound match, aka two eggs of each sound
- Invite little ones to try and match the sounds!
Art:
- Find a paper towel tube
- Cut it into three pieces
- Leave one piece a circle
- Smoosh the other two pieces to make ovals
- Use the paper pieces to make a bunny stamp!